> ## Documentation Index
> Fetch the complete documentation index at: https://docs.dc.ag/llms.txt
> Use this file to discover all available pages before exploring further.
# dynamic commerce - Set Up Webshop Items
> Create items for the webshop, maintain texts, images, variants and cross-selling.
Here we show you how to create a webshop item.
It is important that you first create a master item before you can create a webshop item. By master item, we simply mean a regular item in Microsoft 365 Business Central.
Multiple webshop items can be created for each master item, for example in different languages.
In this example, we will create a golf club as an item.
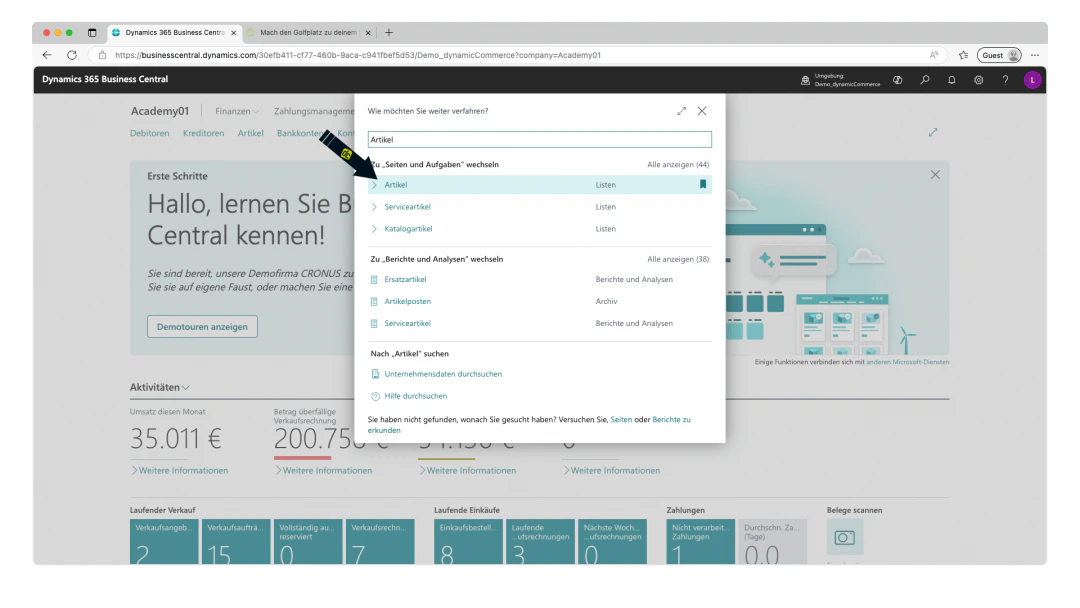
## Step 1: Open the Item List
In order to create items at all, you need to open the "Items" list. To do this, enter "Items" in the search bar to navigate to the Items list.
 ## Step 2: Create a New Master Item
If you have already created a master item and only want to create a webshop item for an existing master item, this step can of course be skipped.
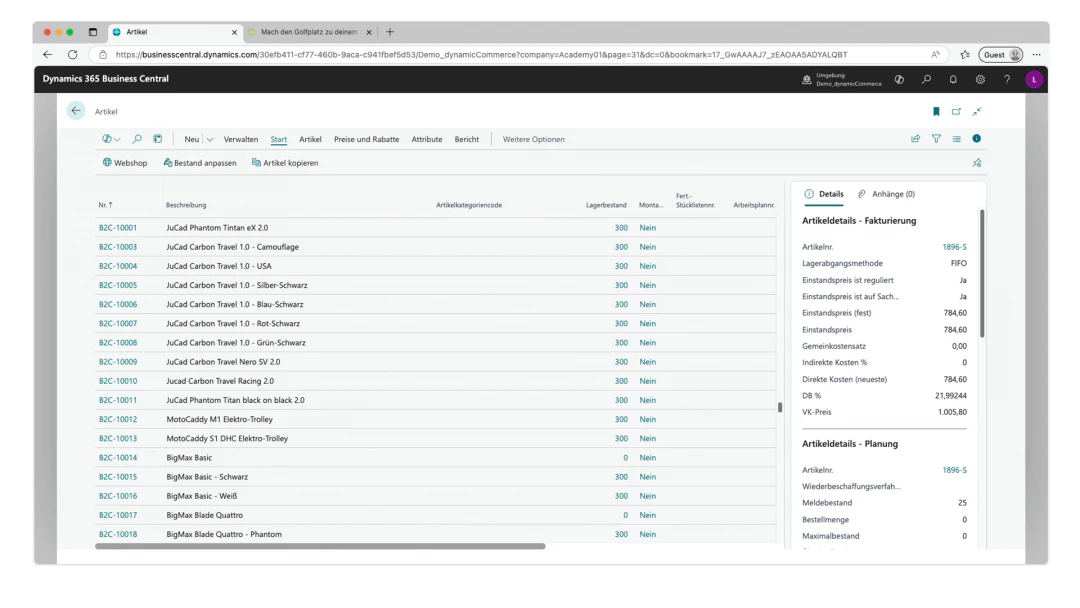
To create a new master item in Microsoft 365 Business Central, simply click "New" in the upper ribbon of the Items list.
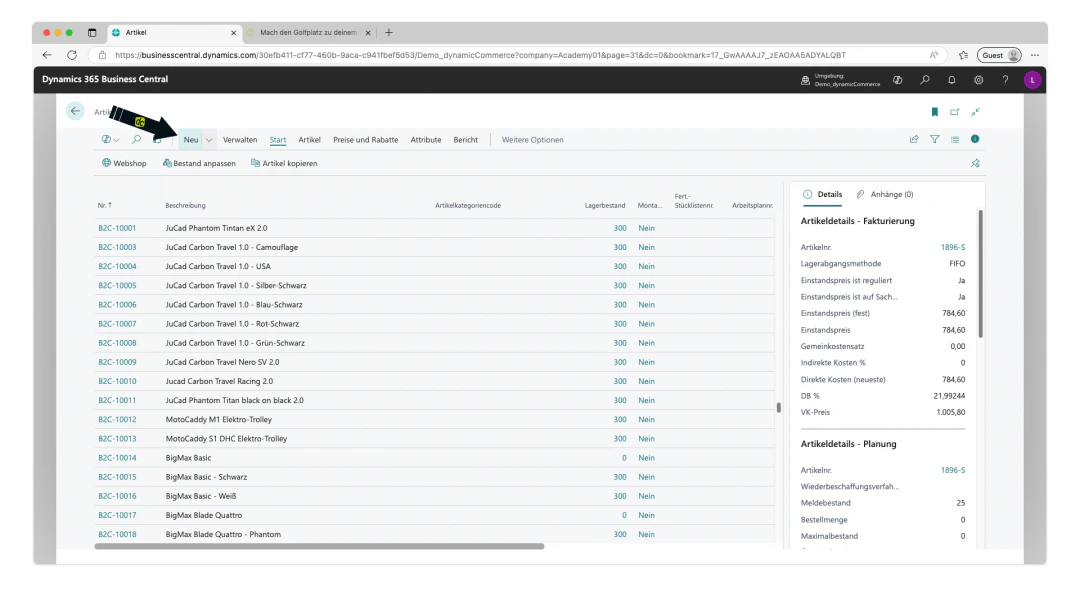
You may then be prompted to select an item template. In our case, we select the item template for B2C items. However, these templates may have different names in your system.
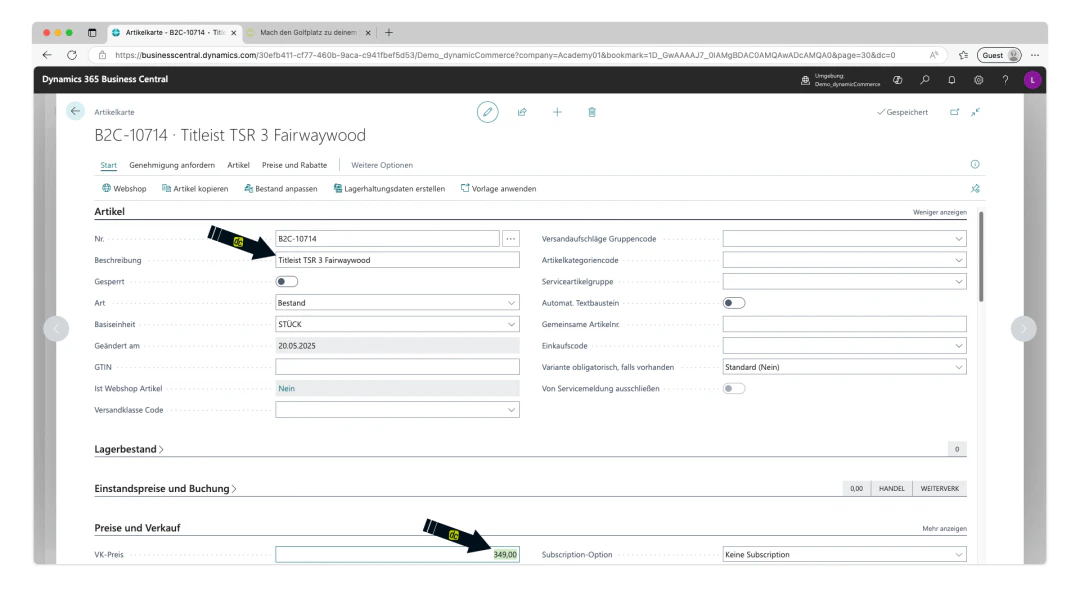
On the item card of the master item, you can now maintain the master data of the item as usual.
In our example, we only maintain the description "Titleist TSR 3 Fairwaywood" and the sales price of €349.
This completes the basic creation of the master item. Of course, various other functions relevant to the webshop can be configured or linked there, such as shipping classes and the settings for our Microsoft Dynamics ERP app Shipping Costs.
## Step 2: Create a New Master Item
If you have already created a master item and only want to create a webshop item for an existing master item, this step can of course be skipped.
To create a new master item in Microsoft 365 Business Central, simply click "New" in the upper ribbon of the Items list.
You may then be prompted to select an item template. In our case, we select the item template for B2C items. However, these templates may have different names in your system.
On the item card of the master item, you can now maintain the master data of the item as usual.
In our example, we only maintain the description "Titleist TSR 3 Fairwaywood" and the sales price of €349.
This completes the basic creation of the master item. Of course, various other functions relevant to the webshop can be configured or linked there, such as shipping classes and the settings for our Microsoft Dynamics ERP app Shipping Costs.
 ## Step 3: Create a Webshop Item
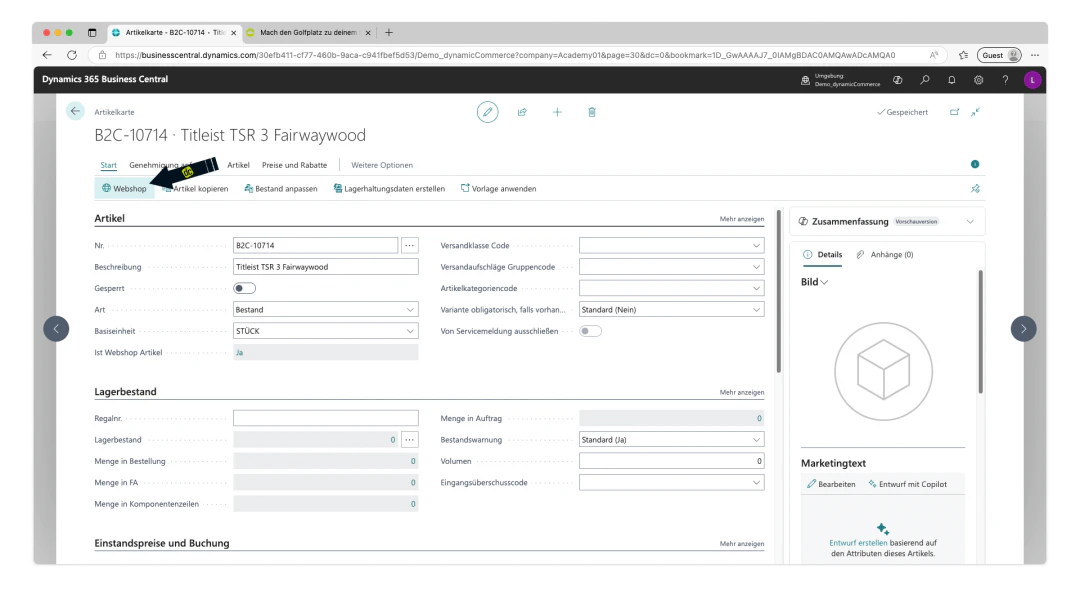
By clicking "Webshop" directly in the ribbon of the master item card, the webshop item is created immediately.
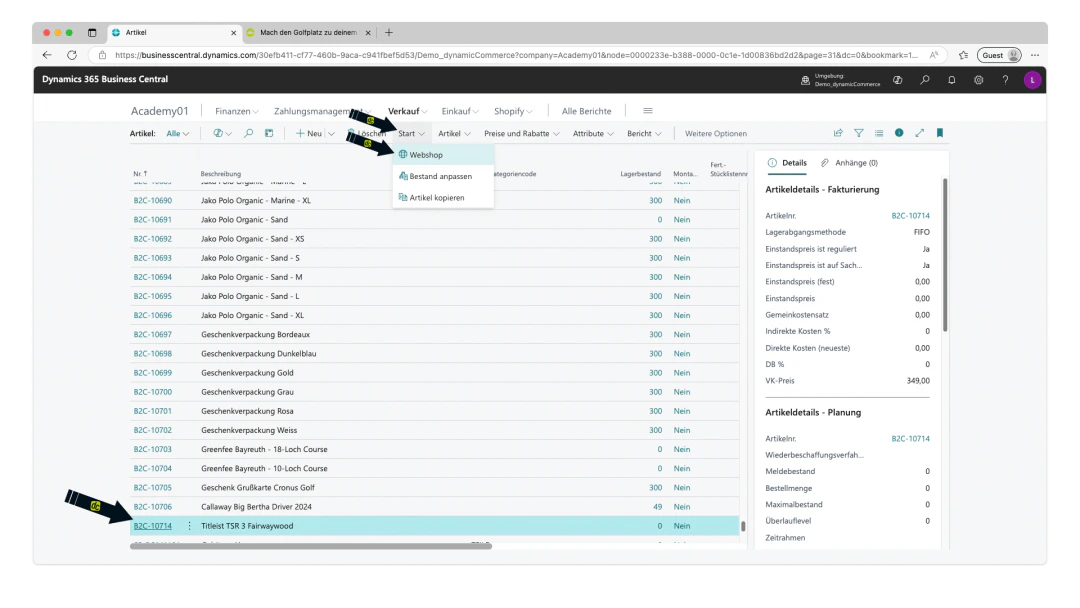
Alternatively, a webshop item for an existing master item can also be created directly from the Items list by selecting the desired master item and clicking the "Start" FastTab in the "Start" ribbon.
Both methods result in the empty webshop item card being opened.
## Step 3: Create a Webshop Item
By clicking "Webshop" directly in the ribbon of the master item card, the webshop item is created immediately.
Alternatively, a webshop item for an existing master item can also be created directly from the Items list by selecting the desired master item and clicking the "Start" FastTab in the "Start" ribbon.
Both methods result in the empty webshop item card being opened.
 ## Step 4: Webshop Selection
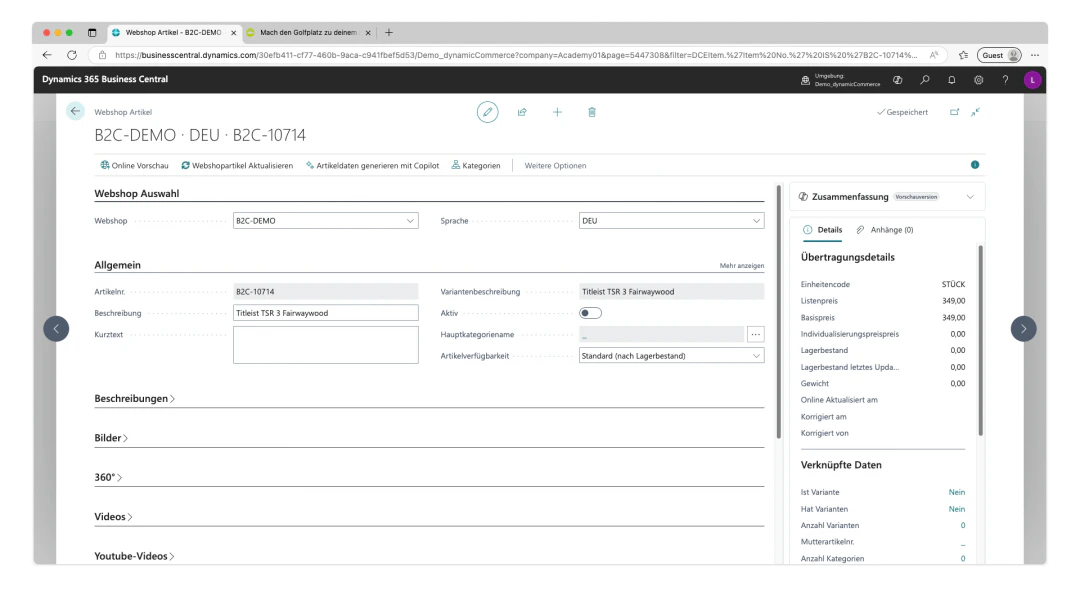
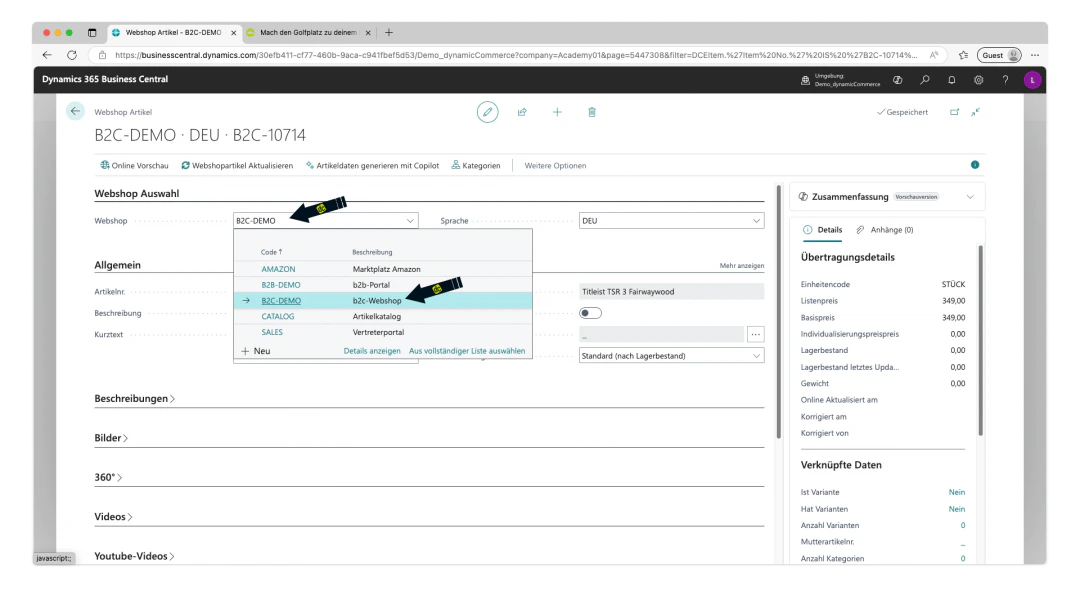
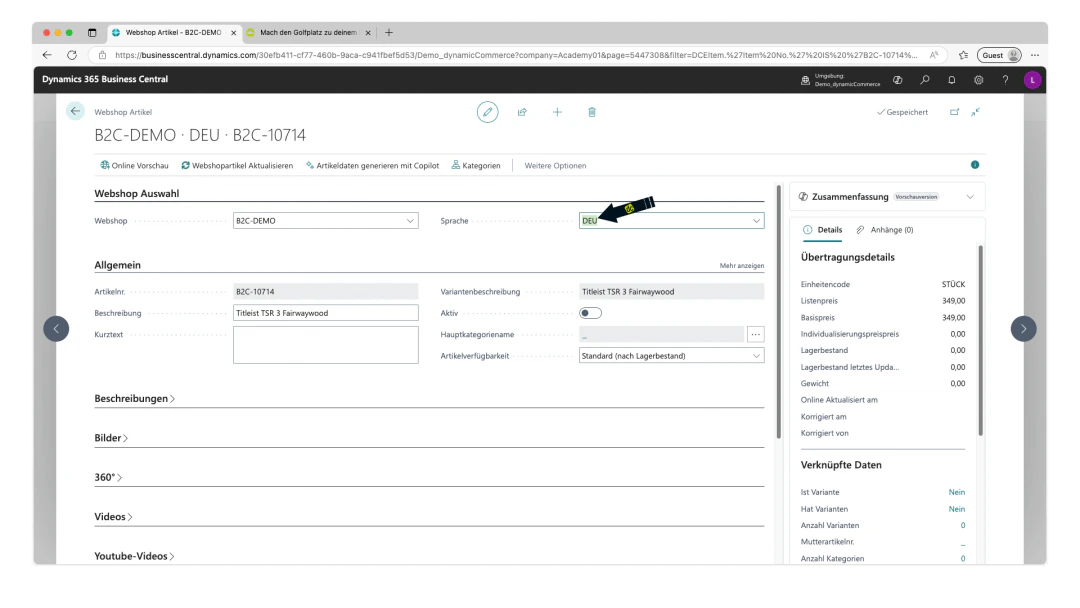
Once on the webshop item card, you should first select the webshop and the webshop language for which the webshop item is to be created under the "Webshop Selection" section.
To do this, simply click on the "Webshop" drop-down menu first and select the desired webshop. Then select the desired language from the "Language" drop-down.
By default, the default webshop from the webshop setup and the default language of that webshop are selected.
We explain the webshop setup here. We also show you here how to set the default language on the webshop.
In our example, we have selected the webshop "B2C-DEMO" and the language "DEU". This is the German demo of our B2C shop "CRONUS GOLF".
## Step 4: Webshop Selection
Once on the webshop item card, you should first select the webshop and the webshop language for which the webshop item is to be created under the "Webshop Selection" section.
To do this, simply click on the "Webshop" drop-down menu first and select the desired webshop. Then select the desired language from the "Language" drop-down.
By default, the default webshop from the webshop setup and the default language of that webshop are selected.
We explain the webshop setup here. We also show you here how to set the default language on the webshop.
In our example, we have selected the webshop "B2C-DEMO" and the language "DEU". This is the German demo of our B2C shop "CRONUS GOLF".
 ## Step 5: Define General Data
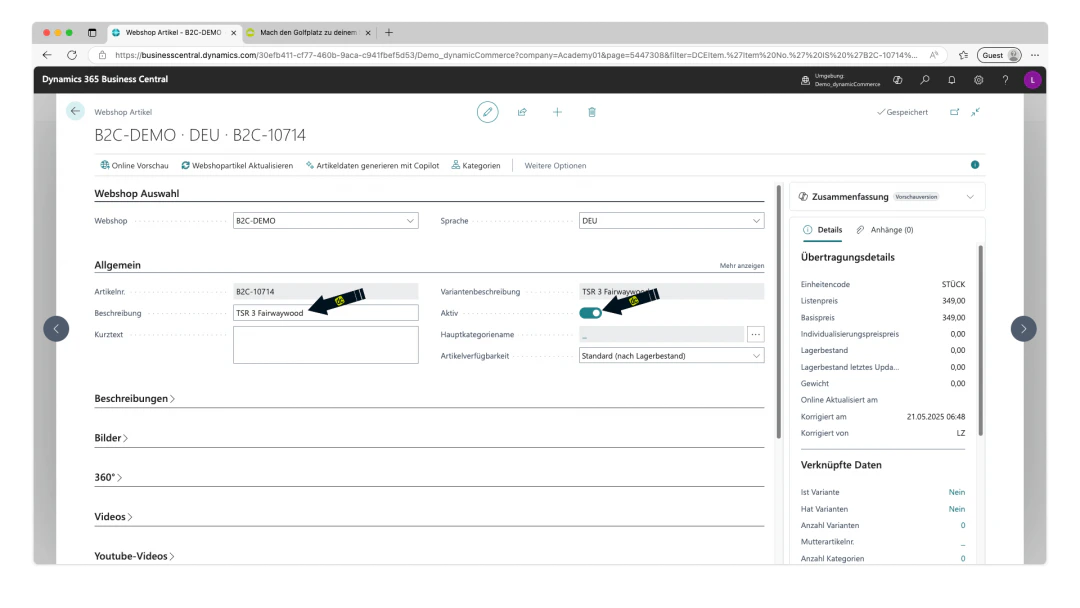
The "General" section contains the general item data.
The "Description" and "Item No." fields are already populated with data from the master item.
For the item to be displayed in the webshop at all, it must first be set to active by enabling the "Active" checkbox.
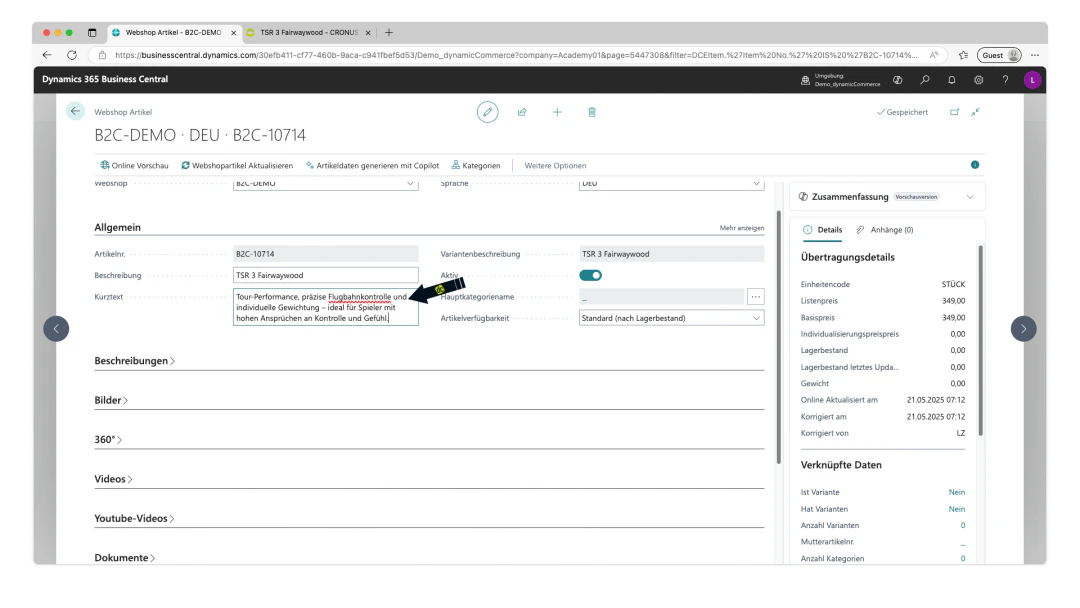
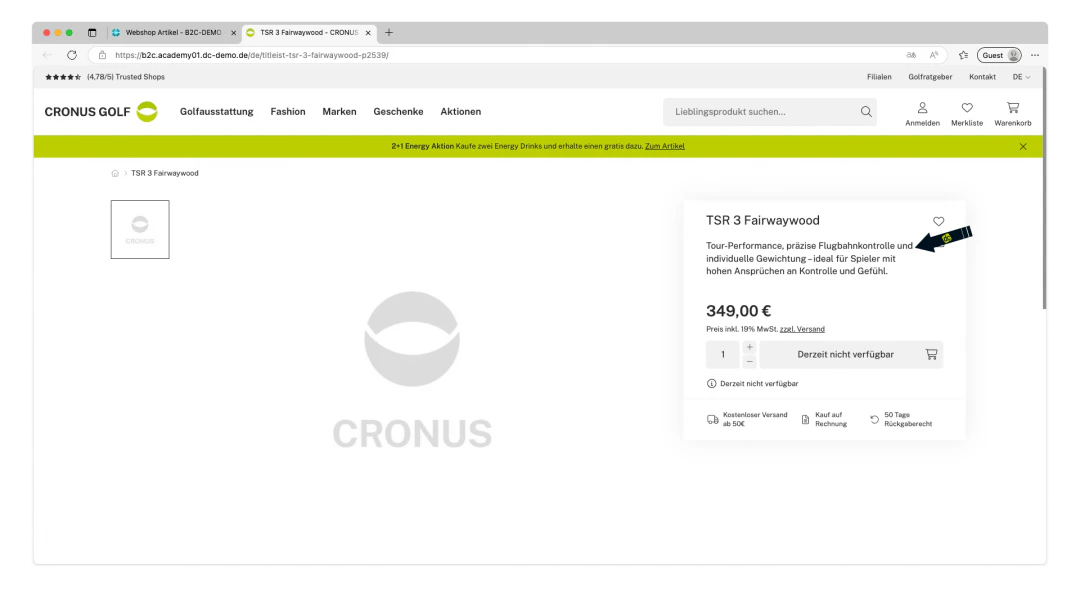
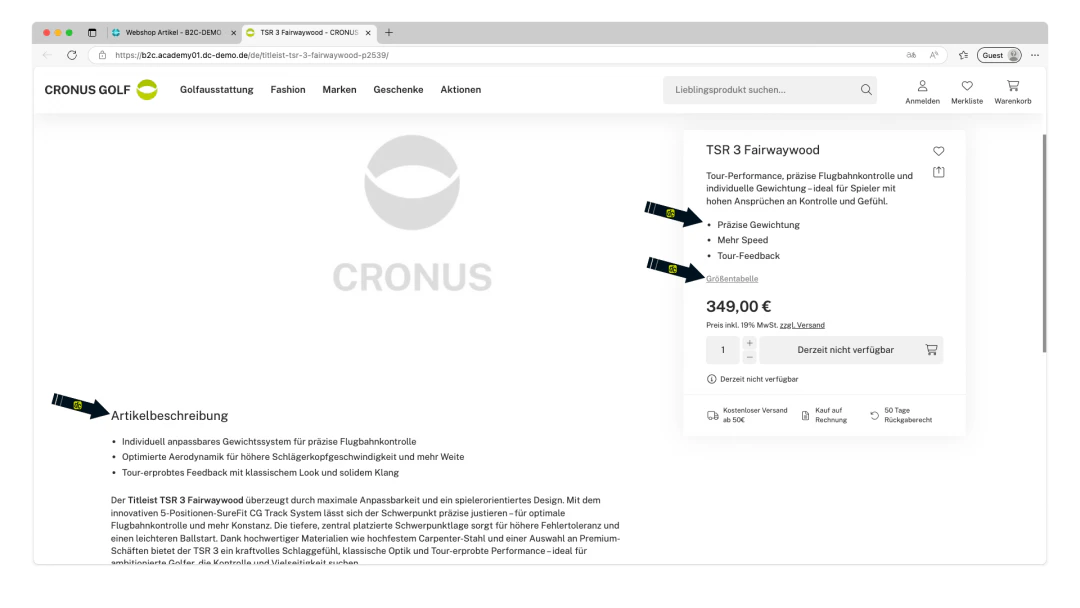
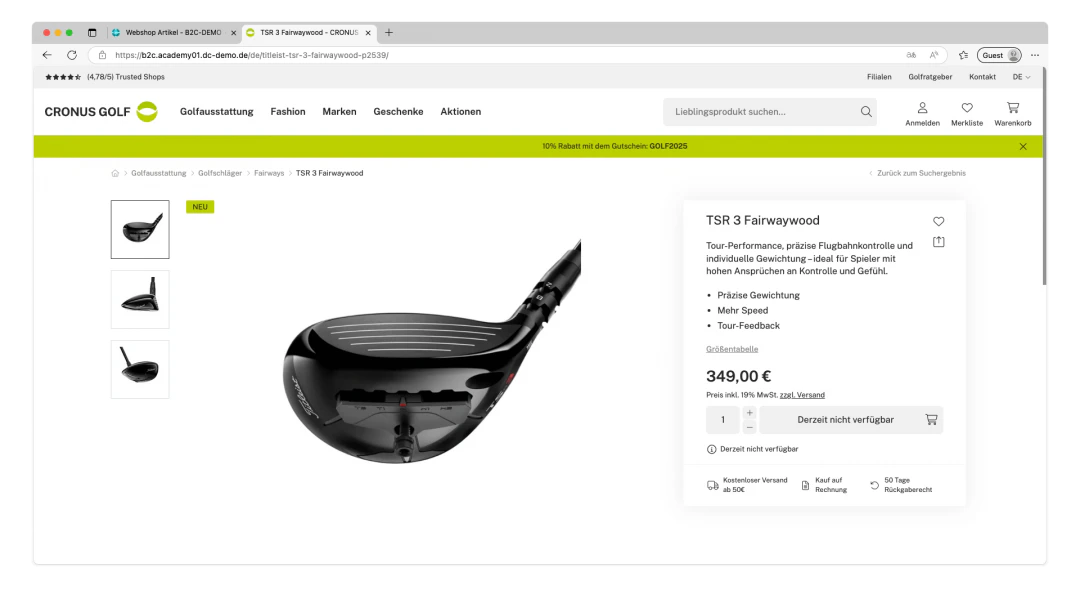
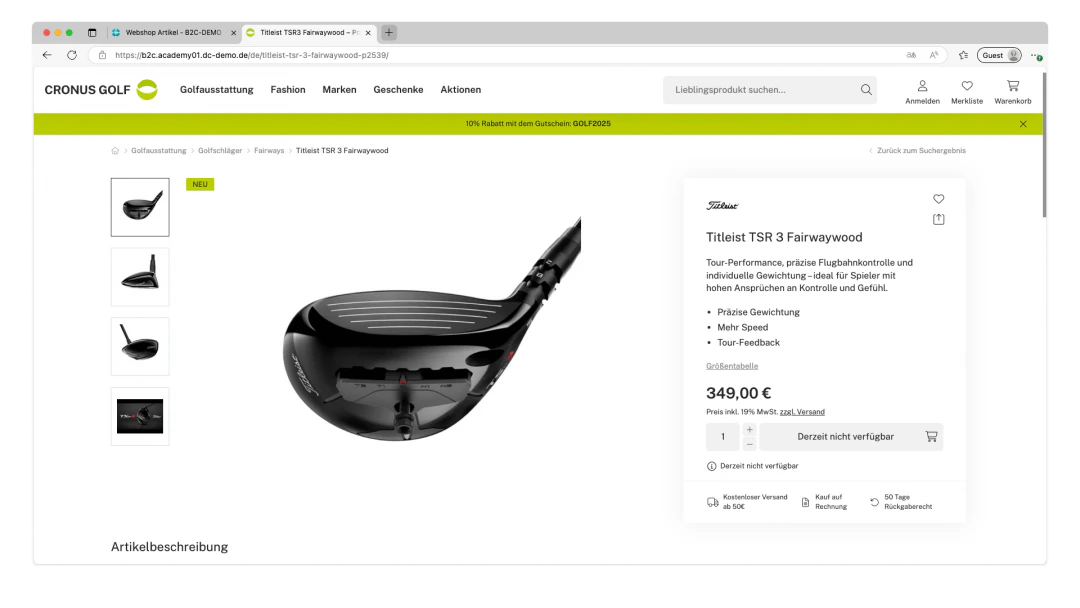
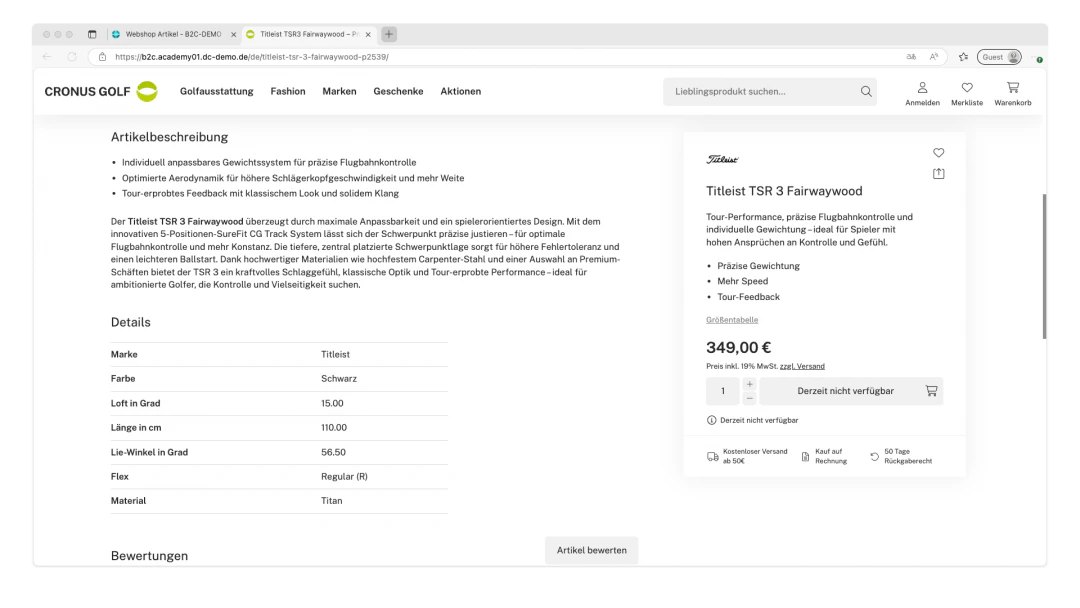
In our example, we set the item to active and adjust the description — i.e. the display name — of the webshop item. We then select a suitable short description. In our current demo layout, this is displayed directly below the item name in the webshop, as can be seen in the screenshots below.
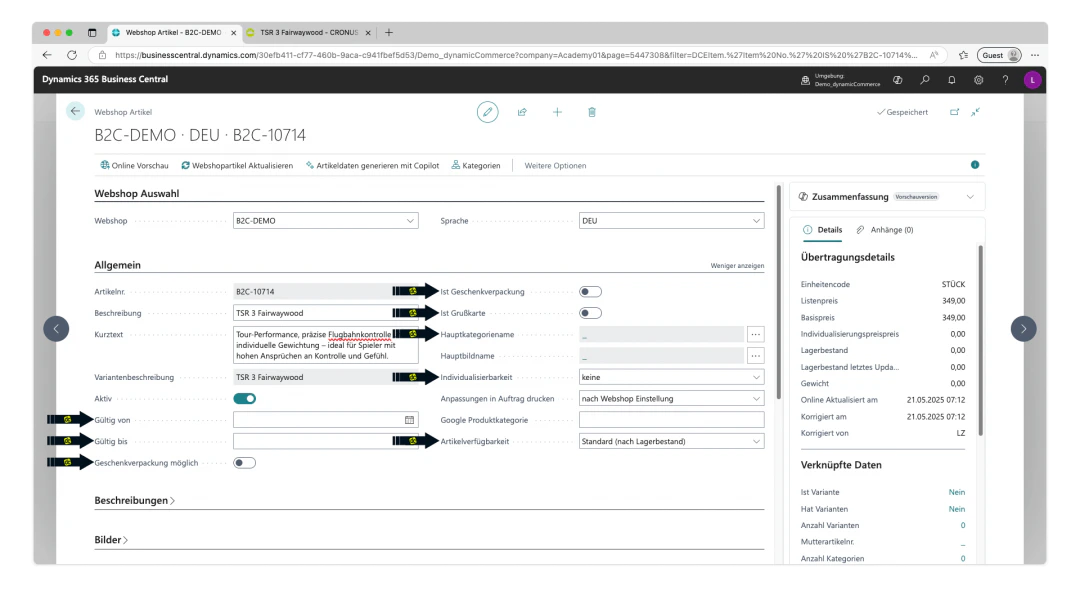
By clicking "Show more" on the section heading, additional fields in the "General" section can be displayed.
The following important settings are located there:
* **Item validity**: Using the "Valid from" and "Valid to" fields, the validity of the webshop item can be restricted to a specific period. By clicking on the fields, you can conveniently select a date in the calendar that opens. The webshop item is then only active from or until the selected date and will no longer be displayed in the webshop before or after that date.
* **Gift wrapping**: The "Gift wrapping possible" checkbox can be used to select whether the item can be sent as a gift. However, gift wrapping must be active as a webshop item and marked with the "Is gift wrapping" checkbox. You can find detailed instructions on gift wrapping here.
* **Greeting cards**: The "Is greeting card" checkbox can be used to mark the webshop item as a greeting card. Instructions on how to create a greeting card that customers can personalise can be found here.
* **Main category name**: The main category of the webshop item is displayed here. If a webshop item is in multiple categories, the main category can also be selected here. More on this in the next step.
* **Customisability**: This drop-down can be used to configure the extent to which the webshop item can be customised. More on this here.
* **Item availability**: This drop-down can be used to make a selection. With the options "Yes" or "No", the webshop item is always or never available regardless of stock levels. With the "By stock level" option, the webshop item is only available if it is in stock. The "Default" option can also be selected, in which case the availability is taken from the webshop.
## Step 5: Define General Data
The "General" section contains the general item data.
The "Description" and "Item No." fields are already populated with data from the master item.
For the item to be displayed in the webshop at all, it must first be set to active by enabling the "Active" checkbox.
In our example, we set the item to active and adjust the description — i.e. the display name — of the webshop item. We then select a suitable short description. In our current demo layout, this is displayed directly below the item name in the webshop, as can be seen in the screenshots below.
By clicking "Show more" on the section heading, additional fields in the "General" section can be displayed.
The following important settings are located there:
* **Item validity**: Using the "Valid from" and "Valid to" fields, the validity of the webshop item can be restricted to a specific period. By clicking on the fields, you can conveniently select a date in the calendar that opens. The webshop item is then only active from or until the selected date and will no longer be displayed in the webshop before or after that date.
* **Gift wrapping**: The "Gift wrapping possible" checkbox can be used to select whether the item can be sent as a gift. However, gift wrapping must be active as a webshop item and marked with the "Is gift wrapping" checkbox. You can find detailed instructions on gift wrapping here.
* **Greeting cards**: The "Is greeting card" checkbox can be used to mark the webshop item as a greeting card. Instructions on how to create a greeting card that customers can personalise can be found here.
* **Main category name**: The main category of the webshop item is displayed here. If a webshop item is in multiple categories, the main category can also be selected here. More on this in the next step.
* **Customisability**: This drop-down can be used to configure the extent to which the webshop item can be customised. More on this here.
* **Item availability**: This drop-down can be used to make a selection. With the options "Yes" or "No", the webshop item is always or never available regardless of stock levels. With the "By stock level" option, the webshop item is only available if it is in stock. The "Default" option can also be selected, in which case the availability is taken from the webshop.

 ## Step 6: Assign the Webshop Item to a Webshop Category
For your created webshop item to also be displayed in the webshop categories, the item must be assigned to them.
The webshop categories must be created beforehand on the webshop language. We show you how this works here.
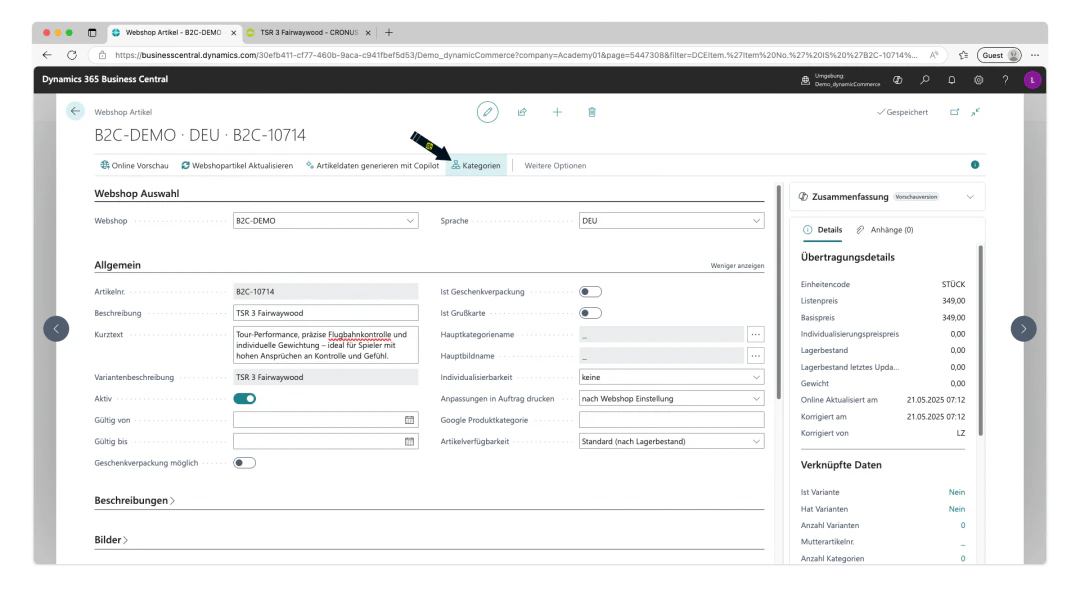
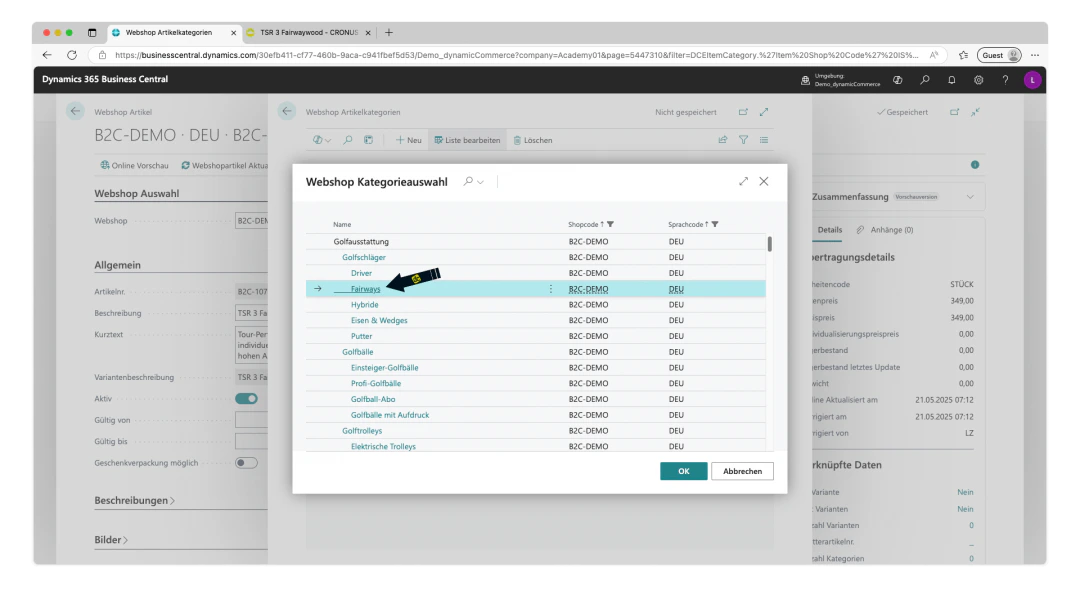
To assign the item to a webshop category, simply click "Categories" in the ribbon of the webshop item card. This opens the "Webshop Item Categories" list.
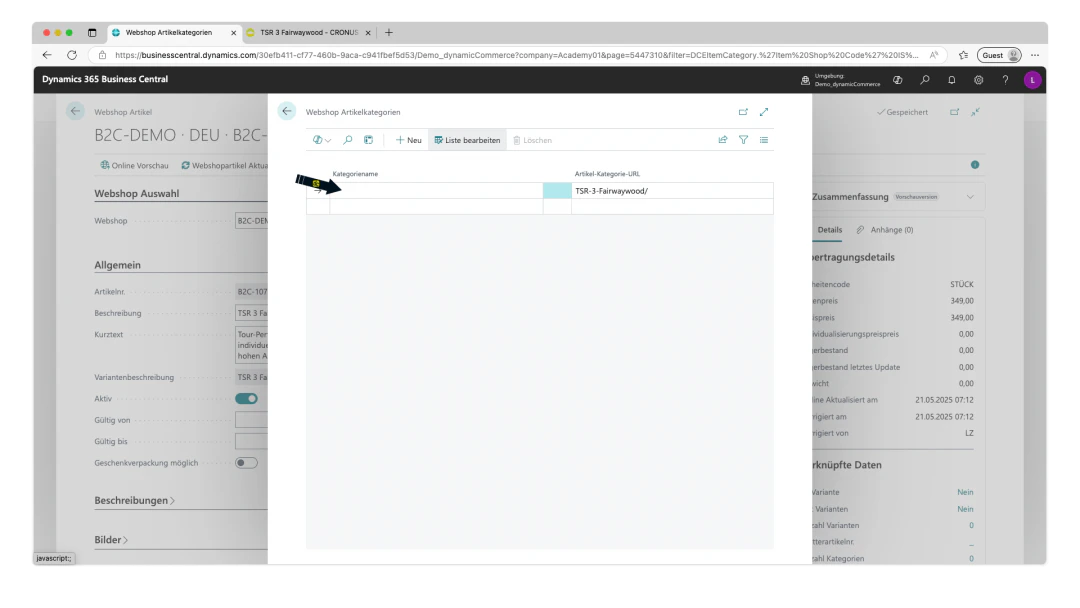
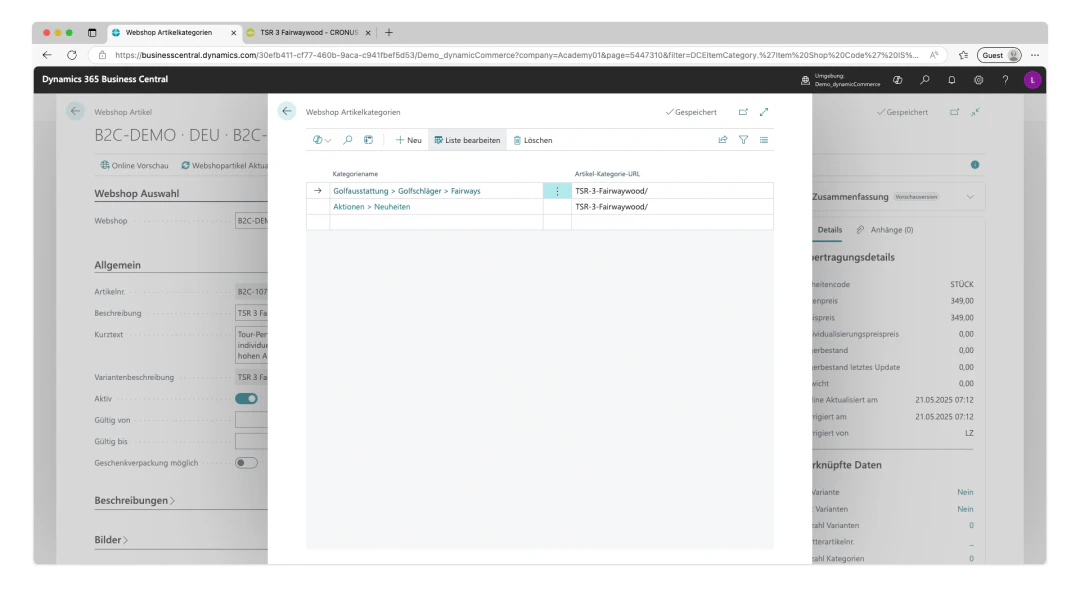
If you click on an empty row in the "Category Name" column, another menu opens in which the desired category can be selected. The selected webshop category is then directly assigned to the webshop item.
In our example, we assign the categories "Fairways" and "New Arrivals" to the item and close the "Webshop Item Categories" list again to return to the webshop item card.
## Step 6: Assign the Webshop Item to a Webshop Category
For your created webshop item to also be displayed in the webshop categories, the item must be assigned to them.
The webshop categories must be created beforehand on the webshop language. We show you how this works here.
To assign the item to a webshop category, simply click "Categories" in the ribbon of the webshop item card. This opens the "Webshop Item Categories" list.
If you click on an empty row in the "Category Name" column, another menu opens in which the desired category can be selected. The selected webshop category is then directly assigned to the webshop item.
In our example, we assign the categories "Fairways" and "New Arrivals" to the item and close the "Webshop Item Categories" list again to return to the webshop item card.
 ## Step 7: Create a Description
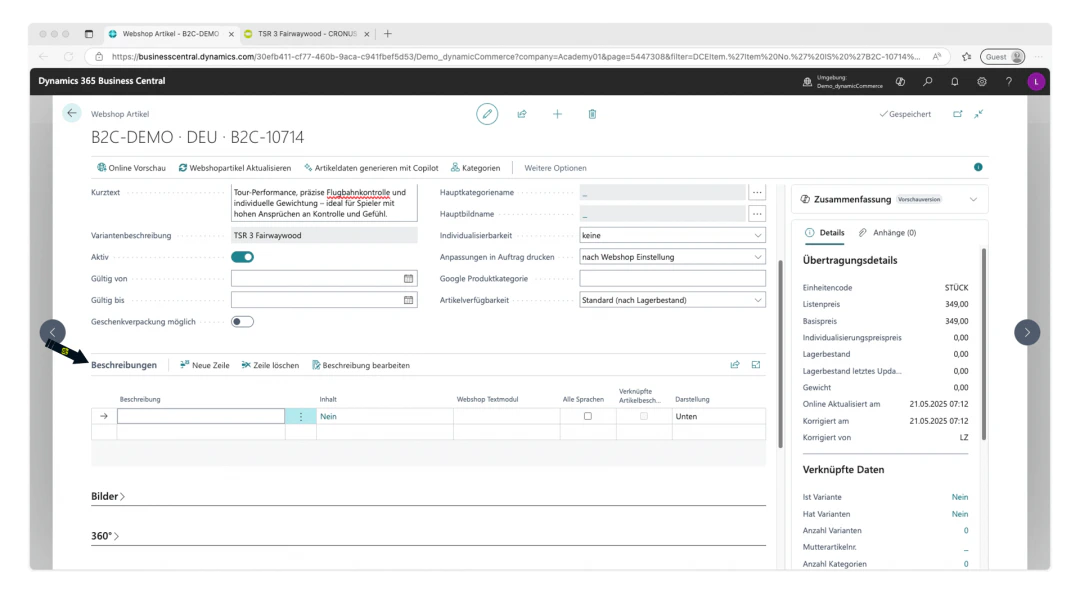
Now it is time to create descriptions for the webshop item.
This is done on the webshop item card under the "Descriptions" section, which must first be expanded by clicking on the heading.
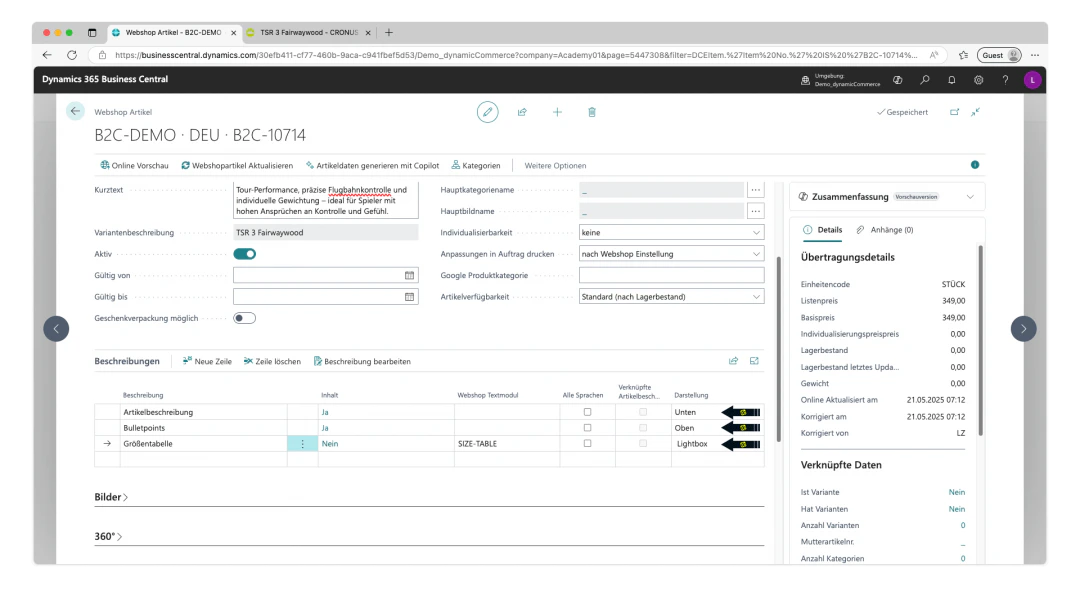
A table with various columns is displayed there:
* **Description**: In the "Description" column, a description for the created entry can be maintained. Depending on the configuration, this is also displayed in the webshop, which is why a meaningful description should be chosen.
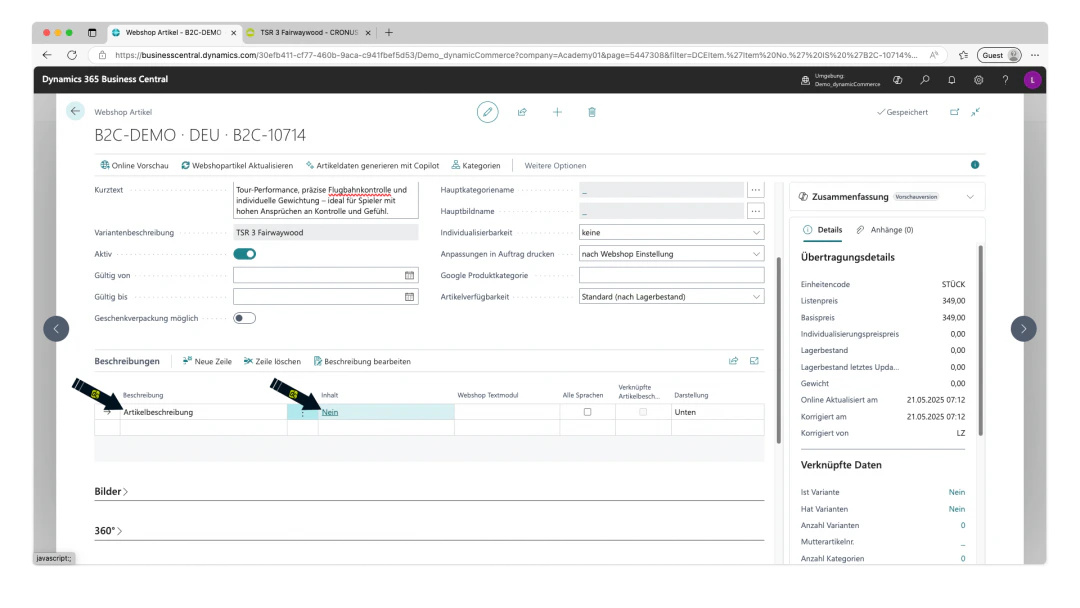
* **Content**: This column shows whether content — i.e. the actual description text — has been maintained for the description. By clicking on the "No" or "Yes" displayed there, the content can be created or edited.
* **Webshop Text Module**: By clicking on the respective cell in the "Webshop Text Module" column, a webshop text block can be assigned to the description instead of content, which then serves as the description text. This is useful for recurring descriptions on the item, such as legal notices for a subscription or a size chart. If a webshop text block is assigned, no content may be maintained on the description. We show you how to create webshop text blocks here.
* **All Languages**: The checkbox in this column can be used to activate the description for all webshop languages. This means that the description created here in the German B2C demo shop will also automatically be displayed in the English B2C demo shop as soon as a webshop item is created for the same master item for the English B2C demo shop as well.
* **Display**: This drop-down can be used to determine where the created description is displayed on the webshop item. "Bottom" causes the description to be displayed below the item, which is well suited for long item descriptions. If "Top" is selected for the display, the description is shown in the so-called buy box of the item. The "Lightbox" display creates a link or button below the item name in the webshop, which is labelled with the text from the "Description" column. When this button is clicked, the description with content opens in a so-called lightbox.
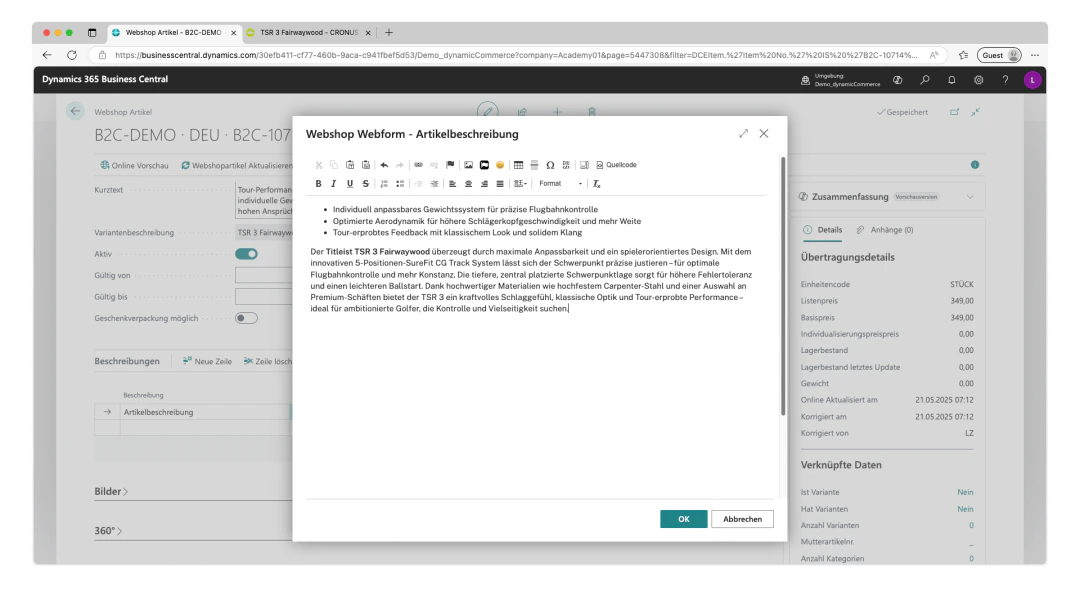
In our example, we first create a row for a detailed item description, to which we assign content by clicking on the "No" in the "Content" column.
This opens our editor for description texts. The editor already has the common text editing functions as buttons. In addition, by clicking "Source code", the description text can be edited directly in HTML.
In the example, we have already written a longer text and formatted it somewhat using the editor. We select "Bottom" as the display.
We also create a description called "Bullet points", which contains three key properties of the webshop item as bullet points in the content, and set the display to "Top".
Finally, we create a description called "Size chart" and assign the text block "SIZE-TABLE", which contains our size chart, to it in the "Webshop Text Module" column. We select "Lightbox" as the display.
The descriptions on the webshop item already look great.
## Step 7: Create a Description
Now it is time to create descriptions for the webshop item.
This is done on the webshop item card under the "Descriptions" section, which must first be expanded by clicking on the heading.
A table with various columns is displayed there:
* **Description**: In the "Description" column, a description for the created entry can be maintained. Depending on the configuration, this is also displayed in the webshop, which is why a meaningful description should be chosen.
* **Content**: This column shows whether content — i.e. the actual description text — has been maintained for the description. By clicking on the "No" or "Yes" displayed there, the content can be created or edited.
* **Webshop Text Module**: By clicking on the respective cell in the "Webshop Text Module" column, a webshop text block can be assigned to the description instead of content, which then serves as the description text. This is useful for recurring descriptions on the item, such as legal notices for a subscription or a size chart. If a webshop text block is assigned, no content may be maintained on the description. We show you how to create webshop text blocks here.
* **All Languages**: The checkbox in this column can be used to activate the description for all webshop languages. This means that the description created here in the German B2C demo shop will also automatically be displayed in the English B2C demo shop as soon as a webshop item is created for the same master item for the English B2C demo shop as well.
* **Display**: This drop-down can be used to determine where the created description is displayed on the webshop item. "Bottom" causes the description to be displayed below the item, which is well suited for long item descriptions. If "Top" is selected for the display, the description is shown in the so-called buy box of the item. The "Lightbox" display creates a link or button below the item name in the webshop, which is labelled with the text from the "Description" column. When this button is clicked, the description with content opens in a so-called lightbox.
In our example, we first create a row for a detailed item description, to which we assign content by clicking on the "No" in the "Content" column.
This opens our editor for description texts. The editor already has the common text editing functions as buttons. In addition, by clicking "Source code", the description text can be edited directly in HTML.
In the example, we have already written a longer text and formatted it somewhat using the editor. We select "Bottom" as the display.
We also create a description called "Bullet points", which contains three key properties of the webshop item as bullet points in the content, and set the display to "Top".
Finally, we create a description called "Size chart" and assign the text block "SIZE-TABLE", which contains our size chart, to it in the "Webshop Text Module" column. We select "Lightbox" as the display.
The descriptions on the webshop item already look great.
 ## Step 8: Add Images
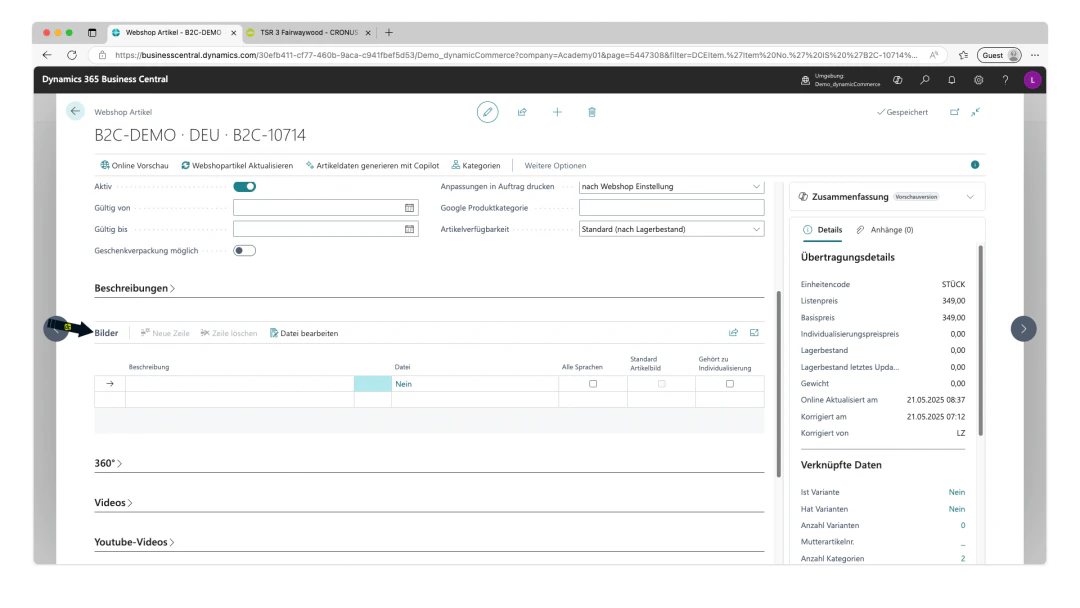
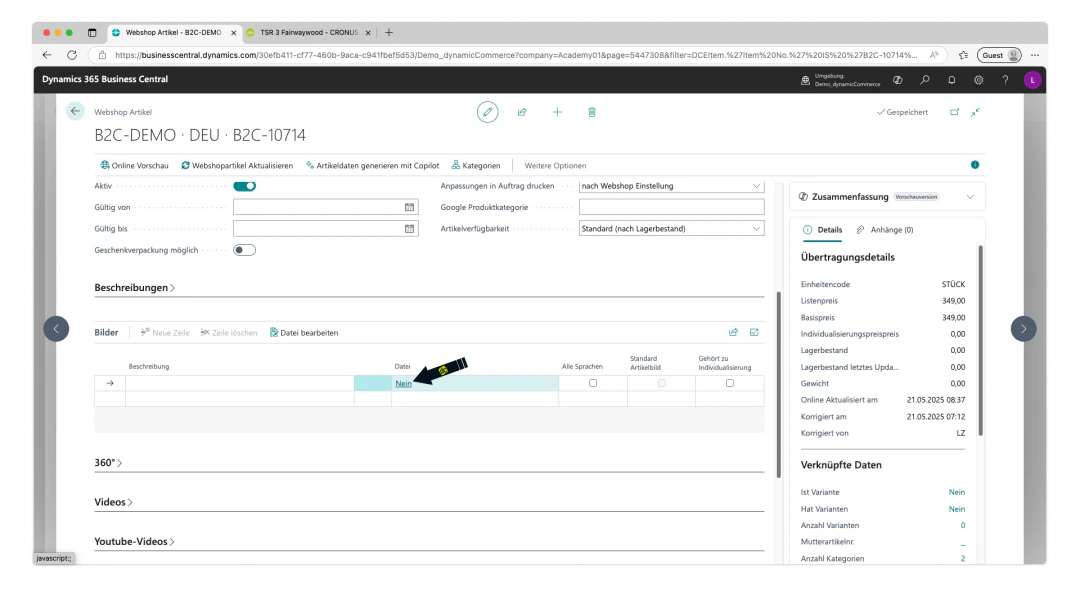
Adding images to the webshop item is done on the webshop item card under the "Images" section, which must first be expanded by clicking on the heading.
A table with the following columns opens there:
* **Description**: Here you can simply enter the description of the image. The description should be meaningful, however, as it is stored as the so-called alt text of the image and is therefore important for SEO and the accessibility of your webshop.
* **File**: This column shows whether a file — i.e. an image — has already been uploaded. If you click on "No" or "Yes", you can upload a new image or replace the existing one.
* **All Languages**: The checkbox in this column can be used to activate the image for all webshop languages. Unlike descriptions, it is generally advisable to activate this checkbox for images so that the images do not need to be maintained for each language.
* **Default Item Image**: This checkbox can only be activated for one of the images and marks that image as the default image of the webshop item. This means that this image is displayed in the item overviews and is the first image shown when the item is opened.
* **Belongs to Customisation**: Only activate this if the image belongs to a customisation. We explain what this means exactly here.
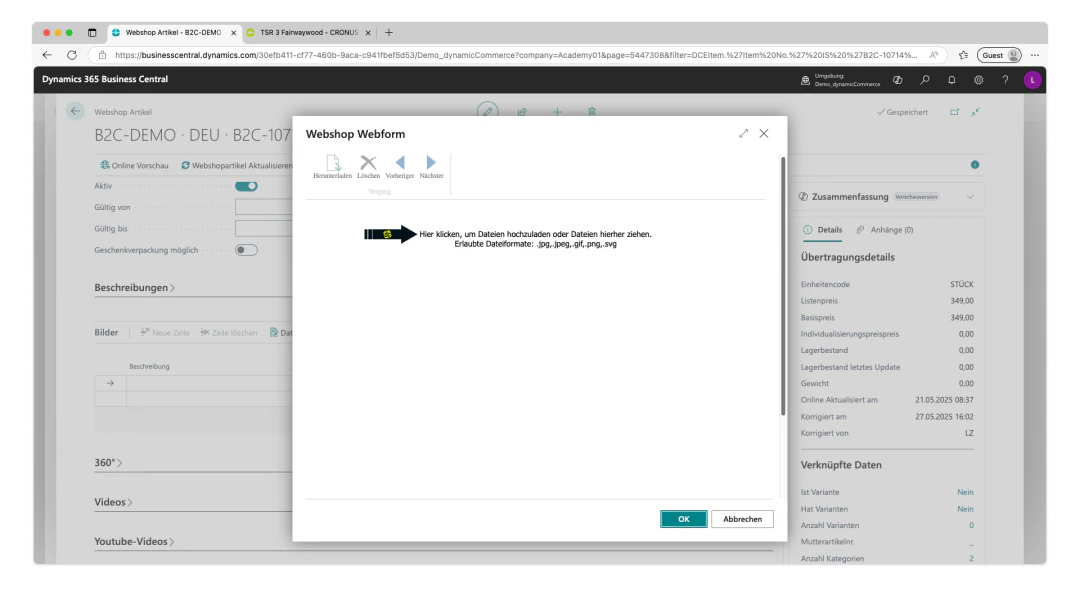
For our example item, we have prepared 3 item images. To save time, multiple images can also be uploaded simultaneously by clicking "No" in the "File" column of the empty table. This opens the web form for uploading files. We simply drag and drop the 3 item images directly from the PC's file explorer into this field.
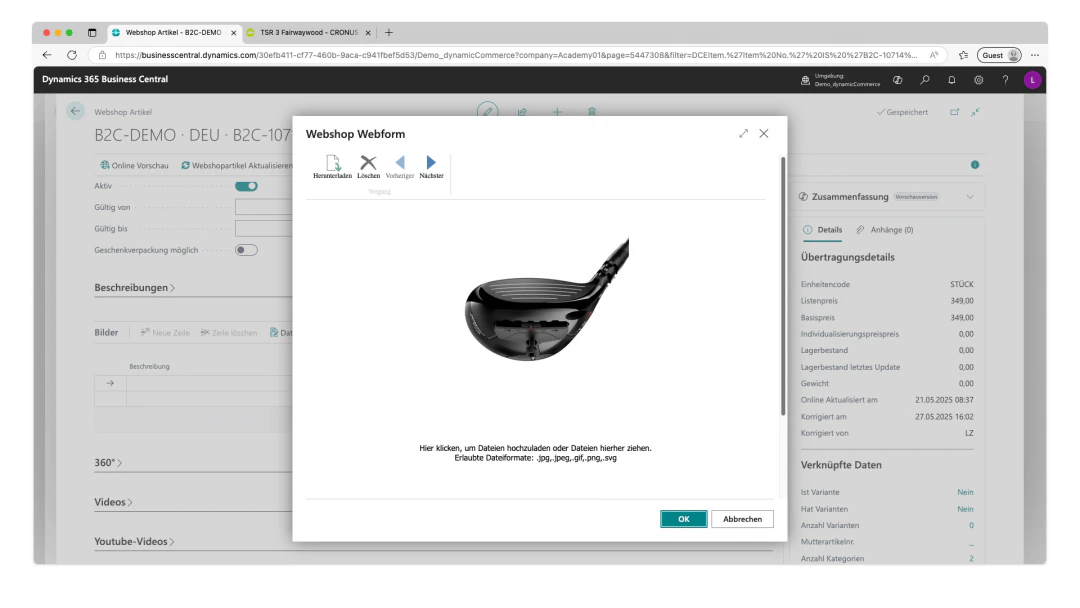
The 3 item images are then uploaded. After the images have been successfully uploaded, the web form can be closed by clicking "OK".
3 rows have been automatically created for the 3 item images and the descriptions have been automatically filled from the file names.
In our example, we also activate the checkboxes in the "All Languages" column for the 3 item images.
We have now also added images to the webshop item.
## Step 8: Add Images
Adding images to the webshop item is done on the webshop item card under the "Images" section, which must first be expanded by clicking on the heading.
A table with the following columns opens there:
* **Description**: Here you can simply enter the description of the image. The description should be meaningful, however, as it is stored as the so-called alt text of the image and is therefore important for SEO and the accessibility of your webshop.
* **File**: This column shows whether a file — i.e. an image — has already been uploaded. If you click on "No" or "Yes", you can upload a new image or replace the existing one.
* **All Languages**: The checkbox in this column can be used to activate the image for all webshop languages. Unlike descriptions, it is generally advisable to activate this checkbox for images so that the images do not need to be maintained for each language.
* **Default Item Image**: This checkbox can only be activated for one of the images and marks that image as the default image of the webshop item. This means that this image is displayed in the item overviews and is the first image shown when the item is opened.
* **Belongs to Customisation**: Only activate this if the image belongs to a customisation. We explain what this means exactly here.
For our example item, we have prepared 3 item images. To save time, multiple images can also be uploaded simultaneously by clicking "No" in the "File" column of the empty table. This opens the web form for uploading files. We simply drag and drop the 3 item images directly from the PC's file explorer into this field.
The 3 item images are then uploaded. After the images have been successfully uploaded, the web form can be closed by clicking "OK".
3 rows have been automatically created for the 3 item images and the descriptions have been automatically filled from the file names.
In our example, we also activate the checkboxes in the "All Languages" column for the 3 item images.
We have now also added images to the webshop item.
 ## Step 9: Add Webshop Item Attributes
You should now also add attributes to the webshop item.
Webshop item attributes can be displayed directly on the item in your webshop. In addition, these attributes can be used to set up filters for the webshop categories. We show you here how to create webshop attributes. We also show you here how to create the webshop attribute filters.
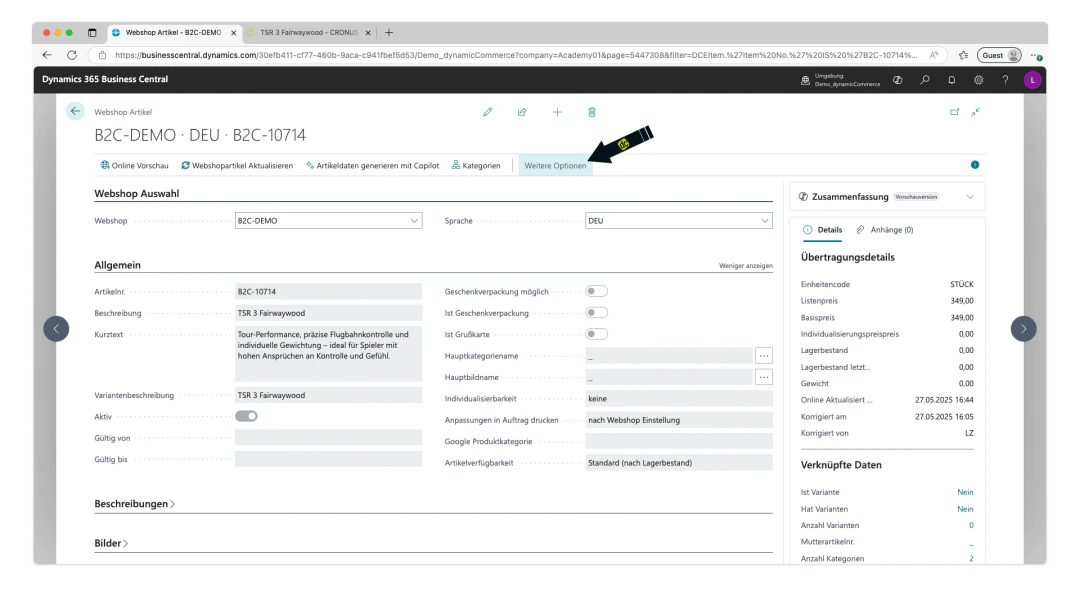
To maintain the attributes on the item, show the additional options in the upper ribbon of the webshop item card by clicking the button of the same name.
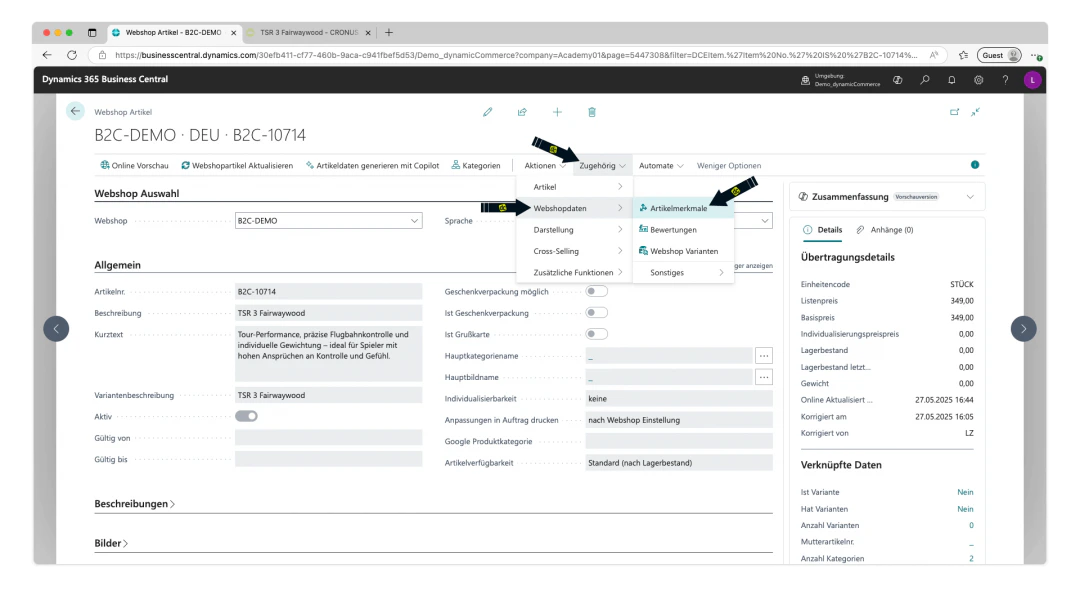
Then click on the newly displayed menu item "Related", which reveals further menus. In the menu for webshop data, you will find the option "Item Attributes", which must now be clicked.
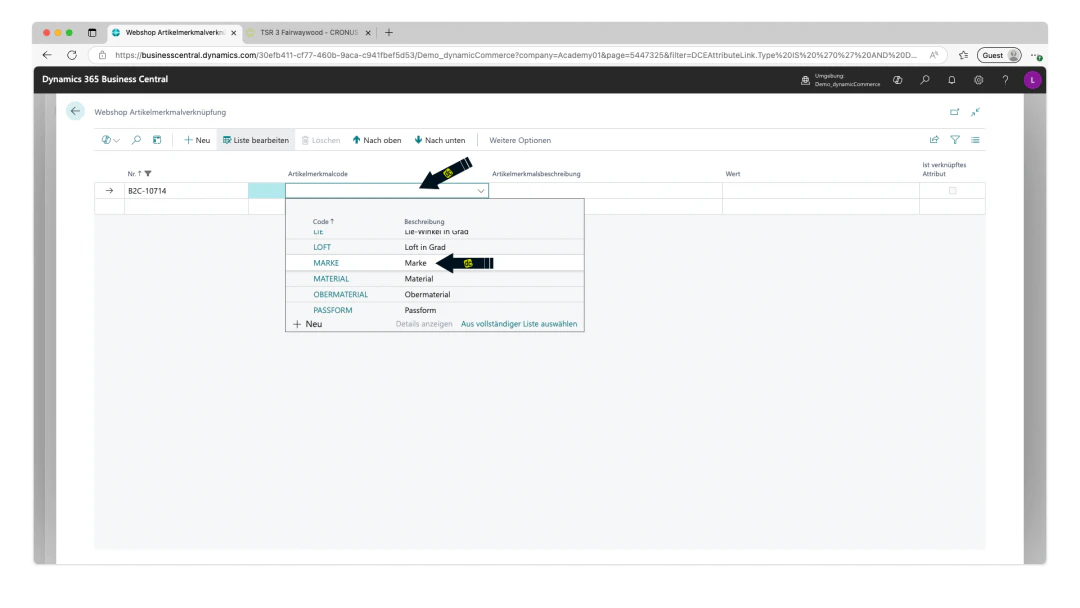
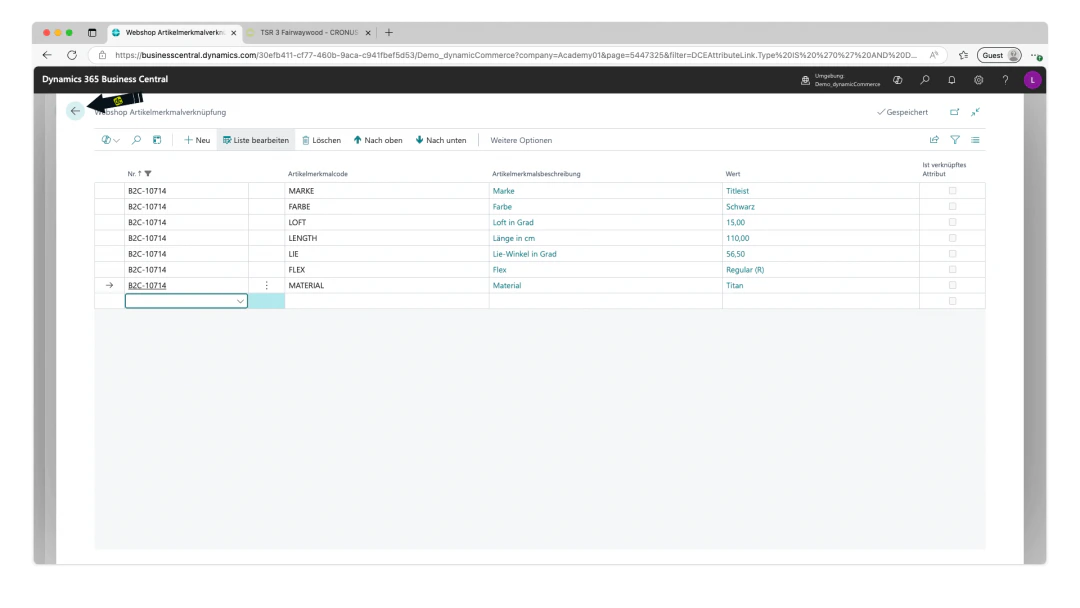
This opens the "Webshop Item Attribute Links" table.
In this table, you can now click on the first empty cell in the "Item Attribute Code" column, which opens a drop-down in which one of the created attributes can be selected. By clicking on the desired attribute, the item attribute code and the item attribute description are automatically filled for the selected attribute.
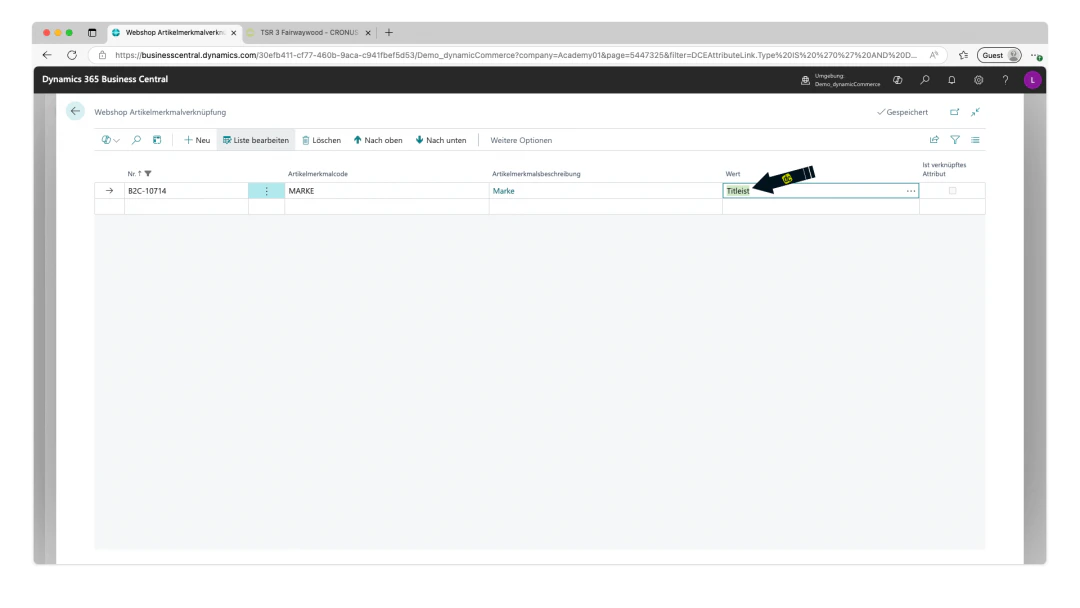
After that, only the associated value for the attribute needs to be filled in. The options depend on how the respective attribute is configured. After you have entered the value of the attribute, a message may appear with the text "Your change may affect related records, which could take a while. Do you want to continue?" You can simply confirm this message with "Yes".
In our example, we first select the attribute "Brand" and enter "Titleist" as the value.
We also maintain the following attributes with the respective values as just described:
* Colour: Black
* Loft (loft in degrees): 15
* Length (length in cm): 110
* Lie (lie angle in degrees): 56.5
* Flex: Regular (R)
* Material: Titanium
The attributes for our example item are now maintained and the "Webshop Item Attribute Links" table can be closed.
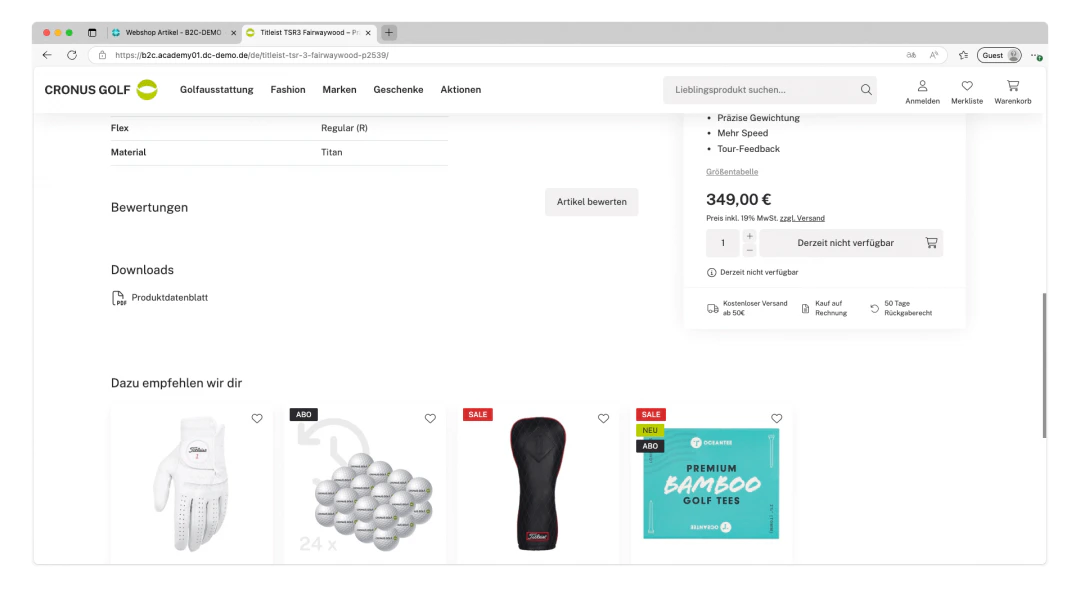
On the webshop item, the attributes are displayed in our case at the bottom in a table with the heading "Details".
## Step 9: Add Webshop Item Attributes
You should now also add attributes to the webshop item.
Webshop item attributes can be displayed directly on the item in your webshop. In addition, these attributes can be used to set up filters for the webshop categories. We show you here how to create webshop attributes. We also show you here how to create the webshop attribute filters.
To maintain the attributes on the item, show the additional options in the upper ribbon of the webshop item card by clicking the button of the same name.
Then click on the newly displayed menu item "Related", which reveals further menus. In the menu for webshop data, you will find the option "Item Attributes", which must now be clicked.
This opens the "Webshop Item Attribute Links" table.
In this table, you can now click on the first empty cell in the "Item Attribute Code" column, which opens a drop-down in which one of the created attributes can be selected. By clicking on the desired attribute, the item attribute code and the item attribute description are automatically filled for the selected attribute.
After that, only the associated value for the attribute needs to be filled in. The options depend on how the respective attribute is configured. After you have entered the value of the attribute, a message may appear with the text "Your change may affect related records, which could take a while. Do you want to continue?" You can simply confirm this message with "Yes".
In our example, we first select the attribute "Brand" and enter "Titleist" as the value.
We also maintain the following attributes with the respective values as just described:
* Colour: Black
* Loft (loft in degrees): 15
* Length (length in cm): 110
* Lie (lie angle in degrees): 56.5
* Flex: Regular (R)
* Material: Titanium
The attributes for our example item are now maintained and the "Webshop Item Attribute Links" table can be closed.
On the webshop item, the attributes are displayed in our case at the bottom in a table with the heading "Details".
 ## Step 10: Link Cross-Sellers
Next, you should also assign cross-sellers to the item.
Cross-sellers are items that are offered in addition to a viewed or purchased item — usually because they are thematically or functionally related to it.
On our webshop items, cross-sellers can be added to the item in the following types:
* **Matching Items**: Products that go well with the current item and complement it meaningfully.
* **Alternative Items**: Similar products that can be considered as a replacement or variant.
* **Alternative Items (with selection)**: These are alternative items that have a preview with an item image on the main item. The classic example of this would be colour variants. We show you exactly how this works here.
* **Accessories**: Complementary products that extend the main item or improve its use.
* **Spare Parts**: Individual parts intended for the replacement or repair of the item.
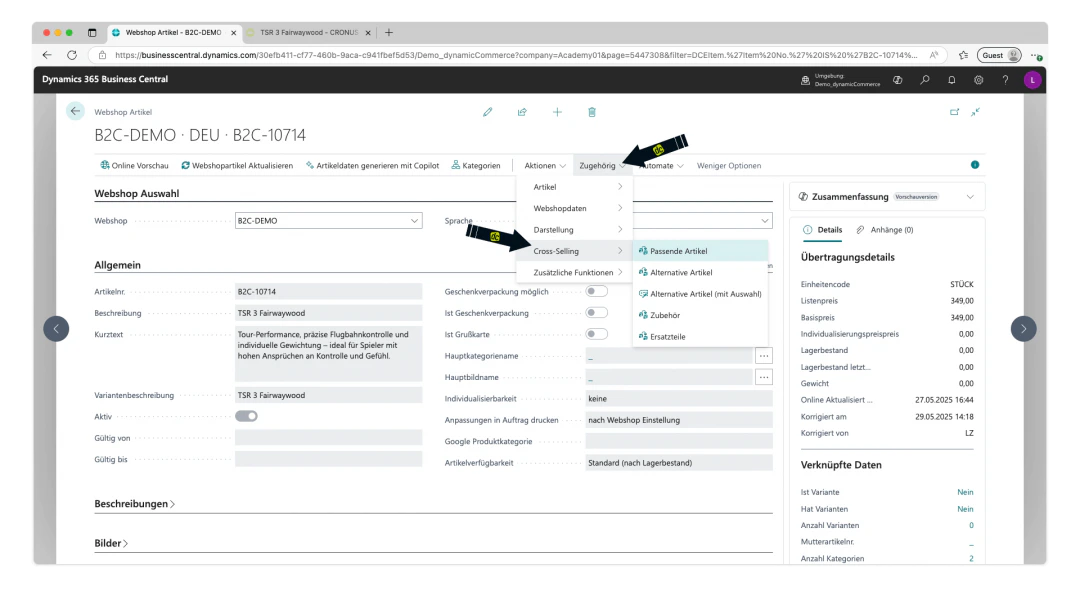
In the upper ribbon on the item card, in the "Related" menu, there is the sub-menu "Cross-Selling", which leads directly to the tables for these cross-selling types.
The maintenance of the various types is identical, which is why we only show you here how to maintain matching items.
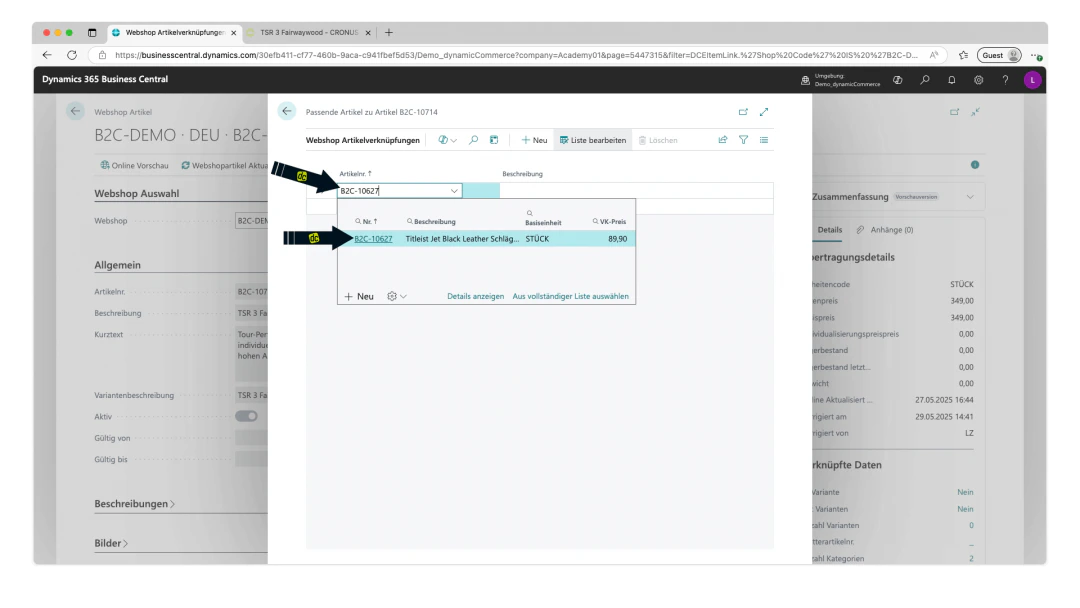
After you have opened the table for matching items, you can click on the first empty cell in the "Item No." column as usual to open a drop-down in which you can select from all items. You can also enter an item number directly there to find the correct item more quickly.
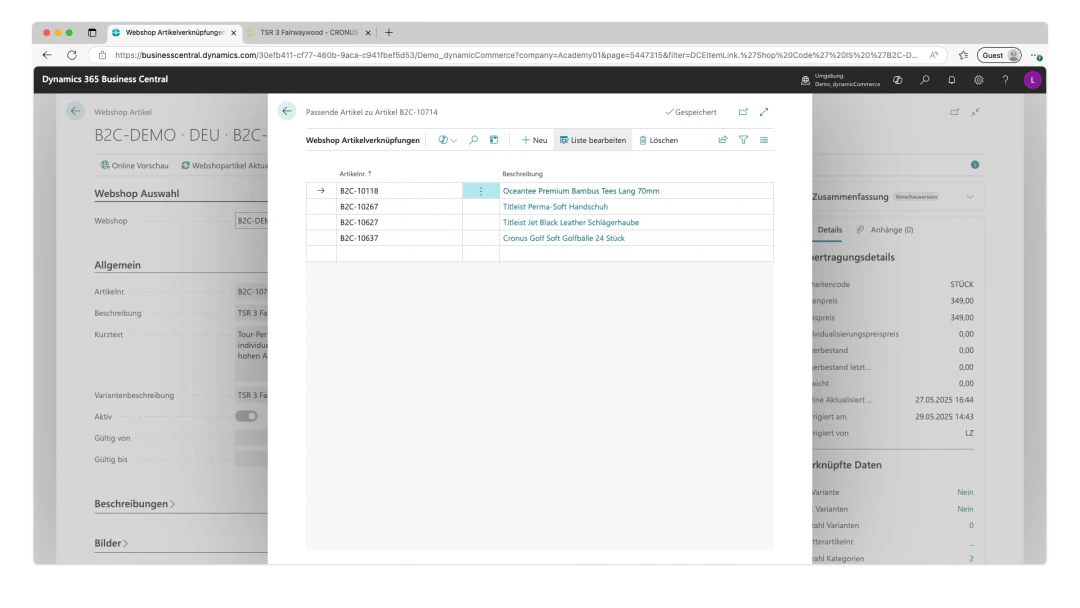
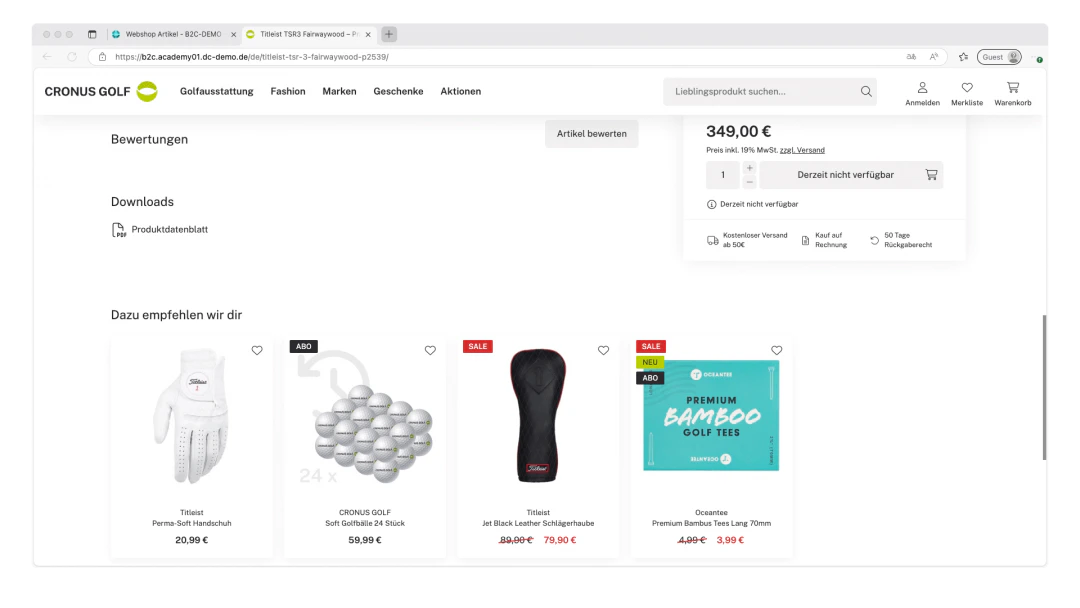
In our example, we therefore select three matching items there.
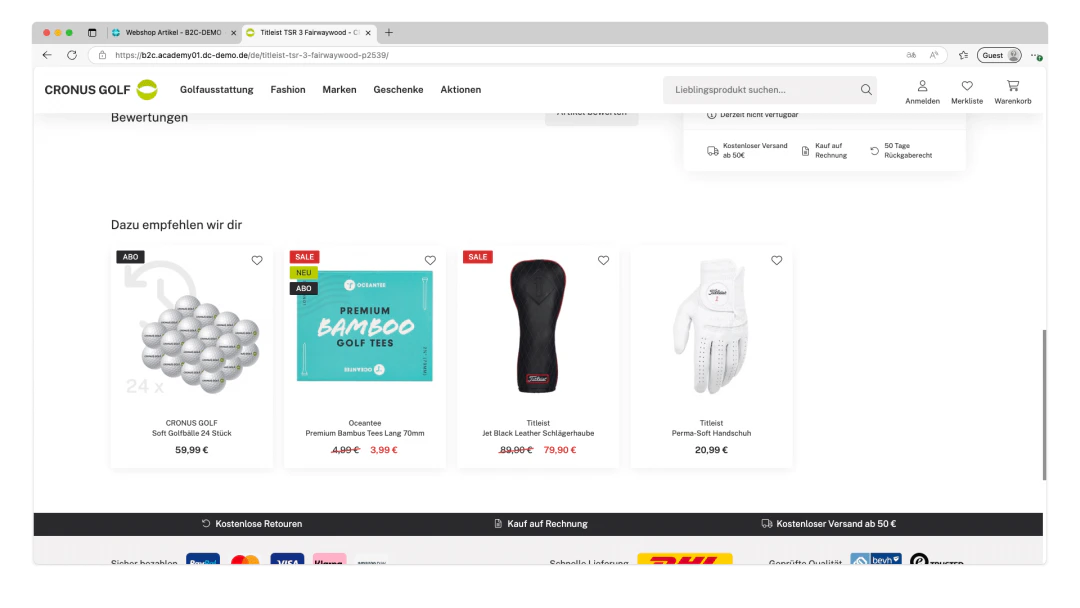
These are then displayed at the bottom of the webshop item as matching items. The text displayed above the items can be freely configured. Here it reads "We recommend these for you".
## Step 10: Link Cross-Sellers
Next, you should also assign cross-sellers to the item.
Cross-sellers are items that are offered in addition to a viewed or purchased item — usually because they are thematically or functionally related to it.
On our webshop items, cross-sellers can be added to the item in the following types:
* **Matching Items**: Products that go well with the current item and complement it meaningfully.
* **Alternative Items**: Similar products that can be considered as a replacement or variant.
* **Alternative Items (with selection)**: These are alternative items that have a preview with an item image on the main item. The classic example of this would be colour variants. We show you exactly how this works here.
* **Accessories**: Complementary products that extend the main item or improve its use.
* **Spare Parts**: Individual parts intended for the replacement or repair of the item.
In the upper ribbon on the item card, in the "Related" menu, there is the sub-menu "Cross-Selling", which leads directly to the tables for these cross-selling types.
The maintenance of the various types is identical, which is why we only show you here how to maintain matching items.
After you have opened the table for matching items, you can click on the first empty cell in the "Item No." column as usual to open a drop-down in which you can select from all items. You can also enter an item number directly there to find the correct item more quickly.
In our example, we therefore select three matching items there.
These are then displayed at the bottom of the webshop item as matching items. The text displayed above the items can be freely configured. Here it reads "We recommend these for you".
 ## Step 11: Update the Webshop Item
You should now also maintain the metadata of the webshop item.
This metadata consists of additional information that is not directly visible on the item page, but helps search engines to better understand the content and display it correctly in search results.
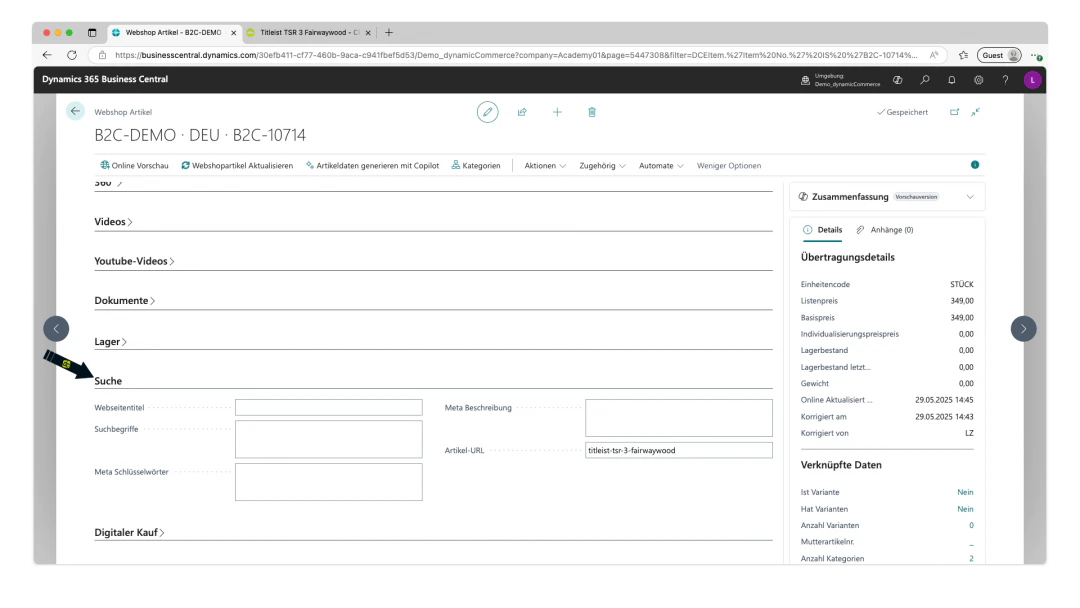
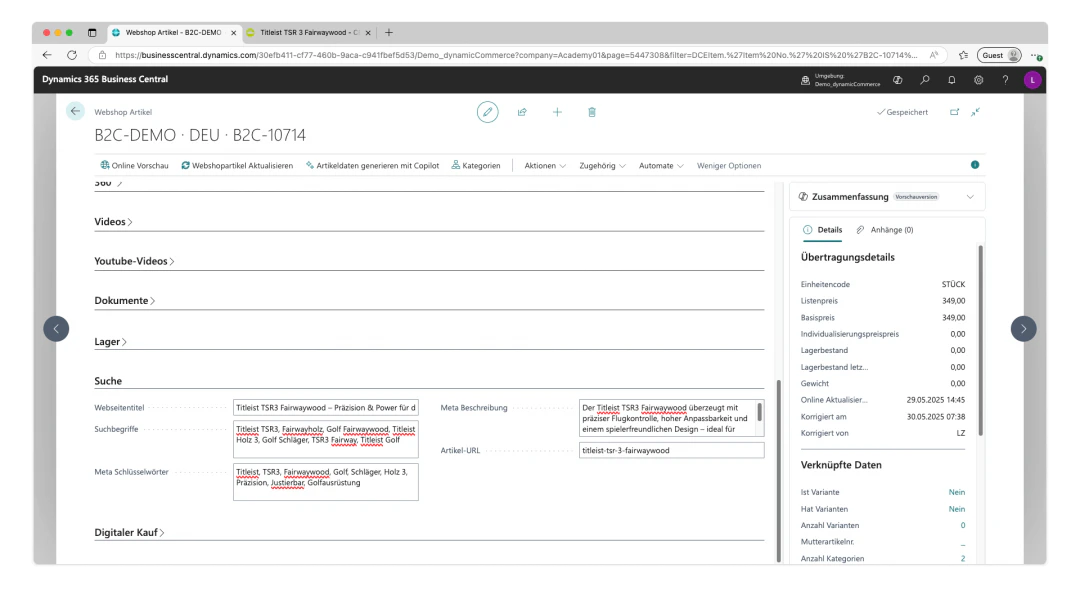
This can be maintained directly on the webshop item card under the "Search" section.
The following fields are located there, in which the respective metadata can be maintained as text:
* **Page title**: The title displayed in the browser tab and in Google search results — it should concisely describe the content of the page.
* **Search terms**: Relevant words or phrases under which the item should be found in the internal search or external search engines.
* **Meta keywords**: (outdated, but sometimes still used) Keywords that categorise the content thematically — today usually without influence on Google rankings.
* **Meta description**: A brief summary of the item that is displayed in search results and is intended to encourage users to click.
In our example, we fill in the metadata in this section. The various search terms and keywords should be separated by a comma.
## Step 11: Update the Webshop Item
You should now also maintain the metadata of the webshop item.
This metadata consists of additional information that is not directly visible on the item page, but helps search engines to better understand the content and display it correctly in search results.
This can be maintained directly on the webshop item card under the "Search" section.
The following fields are located there, in which the respective metadata can be maintained as text:
* **Page title**: The title displayed in the browser tab and in Google search results — it should concisely describe the content of the page.
* **Search terms**: Relevant words or phrases under which the item should be found in the internal search or external search engines.
* **Meta keywords**: (outdated, but sometimes still used) Keywords that categorise the content thematically — today usually without influence on Google rankings.
* **Meta description**: A brief summary of the item that is displayed in search results and is intended to encourage users to click.
In our example, we fill in the metadata in this section. The various search terms and keywords should be separated by a comma.
 ## Optional: Add Videos to the Webshop Item
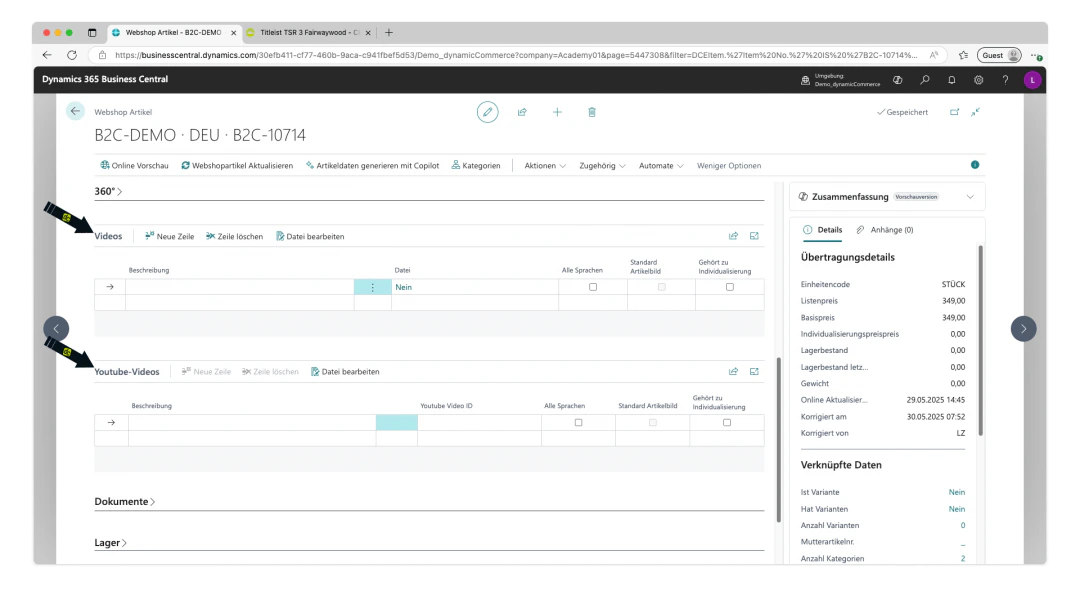
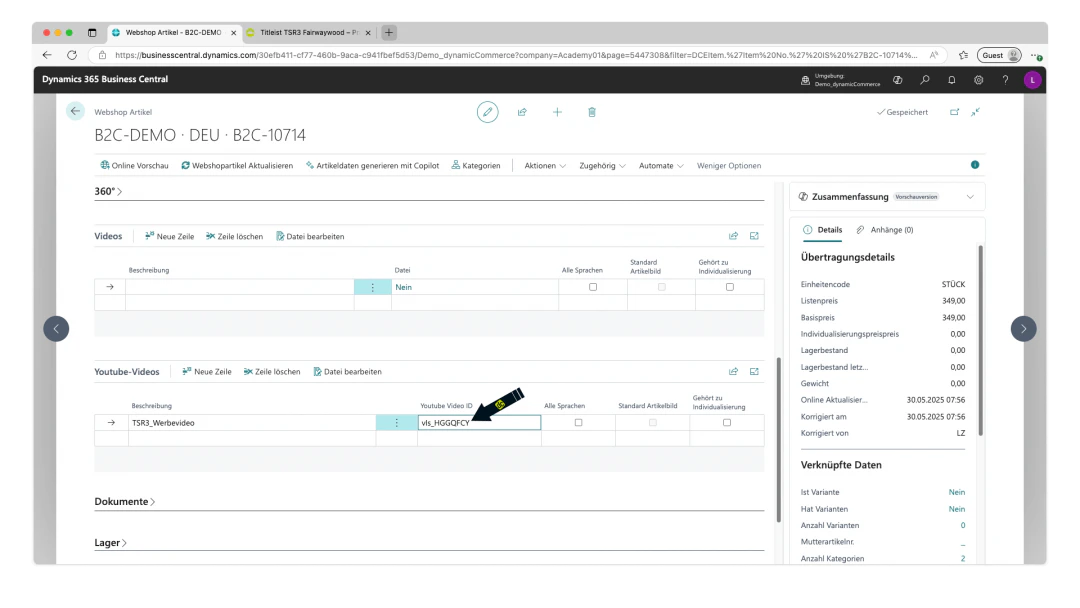
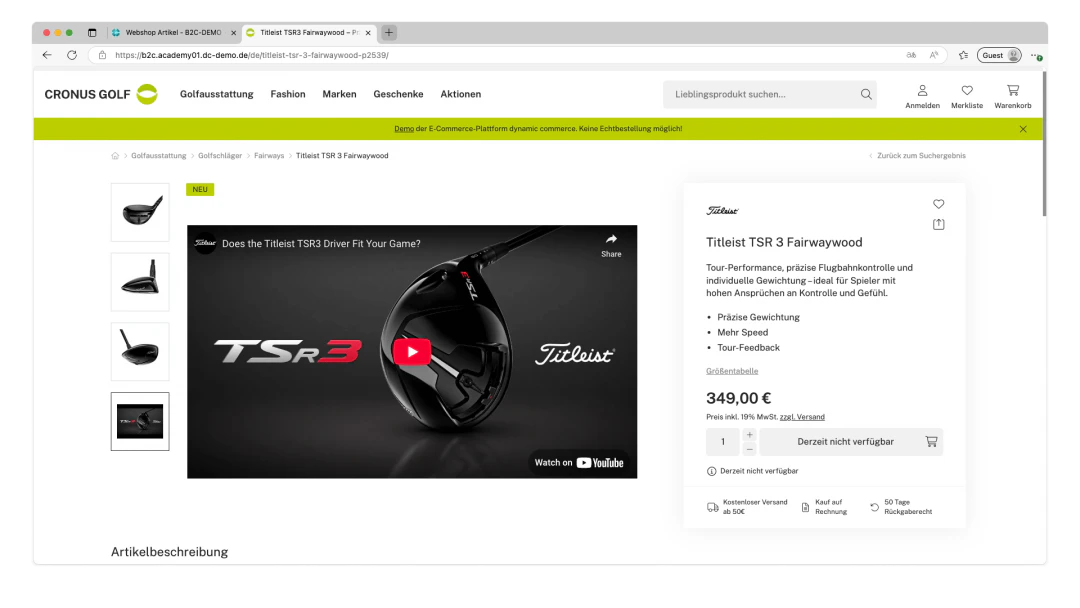
Optionally, you can maintain various types of videos on the webshop item under the "Videos" and "YouTube Videos" sections.
Regular videos are effectively maintained in the same way as images, with the difference that a video file must be uploaded.
For YouTube videos, only a description and the YouTube video ID need to be maintained.
The YouTube video ID is a short code that uniquely identifies each video. You can find it in the URL of the video after "v=" — for example, in *[https://www.youtube.com/watch?v=dQw4w9WgXcQ](https://www.youtube.com/watch?v=dQw4w9WgXcQ)*, "*dQw4w9WgXcQ*" is the video ID.
## Optional: Add Videos to the Webshop Item
Optionally, you can maintain various types of videos on the webshop item under the "Videos" and "YouTube Videos" sections.
Regular videos are effectively maintained in the same way as images, with the difference that a video file must be uploaded.
For YouTube videos, only a description and the YouTube video ID need to be maintained.
The YouTube video ID is a short code that uniquely identifies each video. You can find it in the URL of the video after "v=" — for example, in *[https://www.youtube.com/watch?v=dQw4w9WgXcQ](https://www.youtube.com/watch?v=dQw4w9WgXcQ)*, "*dQw4w9WgXcQ*" is the video ID.
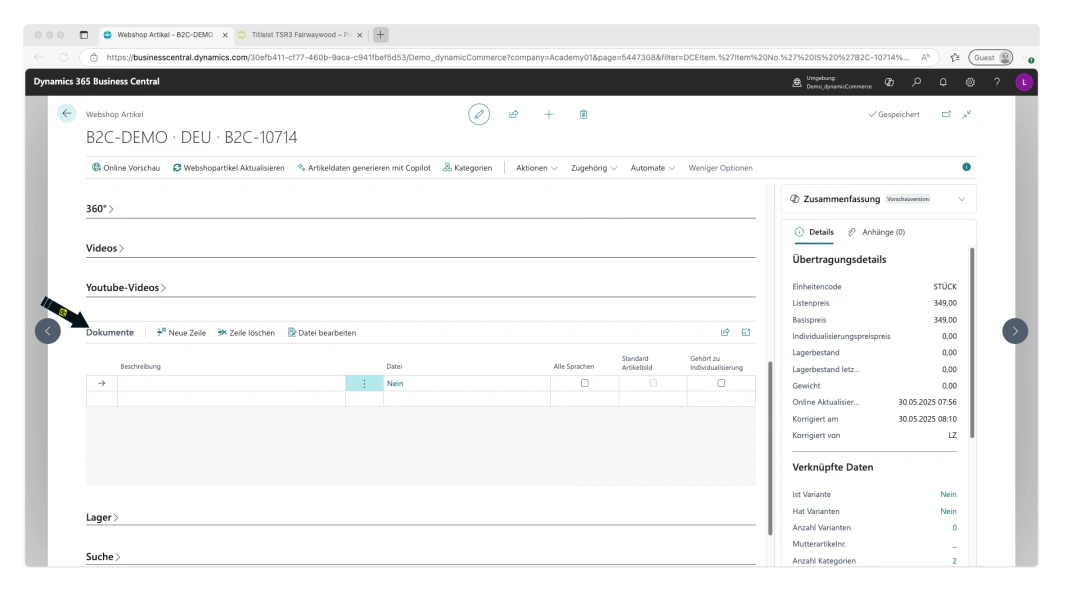
 ## Optional: Add Documents
Under the "Documents" section, you can upload documents to the webshop item that visitors to the webshop can download. These documents are displayed on the item.
This allows, for example, instructions, product data sheets or mandatory information for food products to be made available to visitors as PDFs. Software drivers for items would also be conceivable, as various file formats are supported by the document function (.pdf, .doc, .docx, .txt, .xls, .xlsx, .csv, .rtf, .zip, .rar).
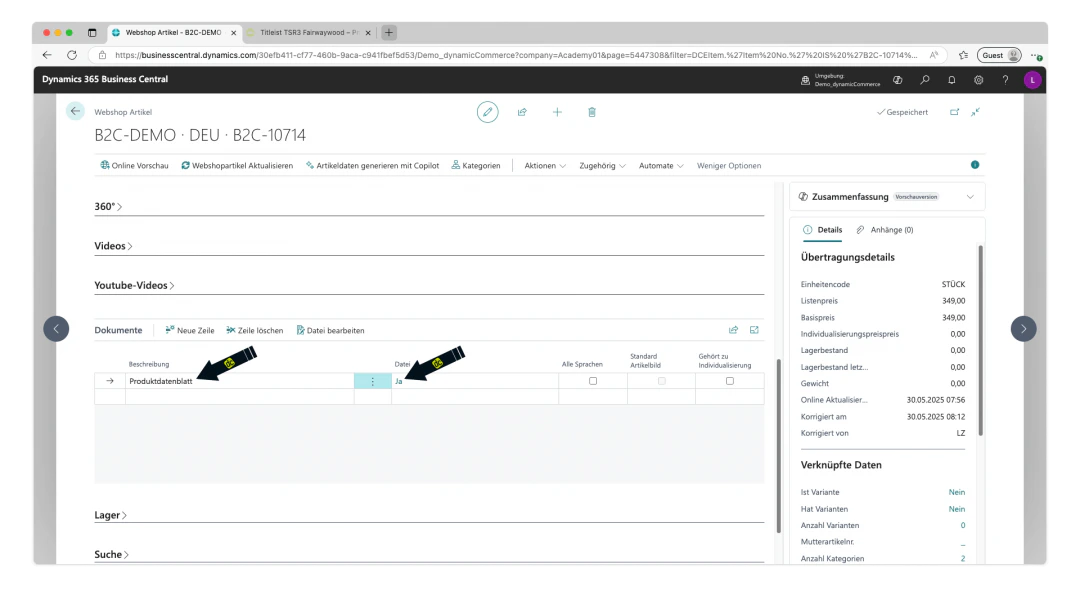
To maintain a document, a description must be assigned as usual and a file must be uploaded by clicking "No" in the "File" column.
In our example, we maintain a product data sheet as a PDF.
## Optional: Add Documents
Under the "Documents" section, you can upload documents to the webshop item that visitors to the webshop can download. These documents are displayed on the item.
This allows, for example, instructions, product data sheets or mandatory information for food products to be made available to visitors as PDFs. Software drivers for items would also be conceivable, as various file formats are supported by the document function (.pdf, .doc, .docx, .txt, .xls, .xlsx, .csv, .rtf, .zip, .rar).
To maintain a document, a description must be assigned as usual and a file must be uploaded by clicking "No" in the "File" column.
In our example, we maintain a product data sheet as a PDF.
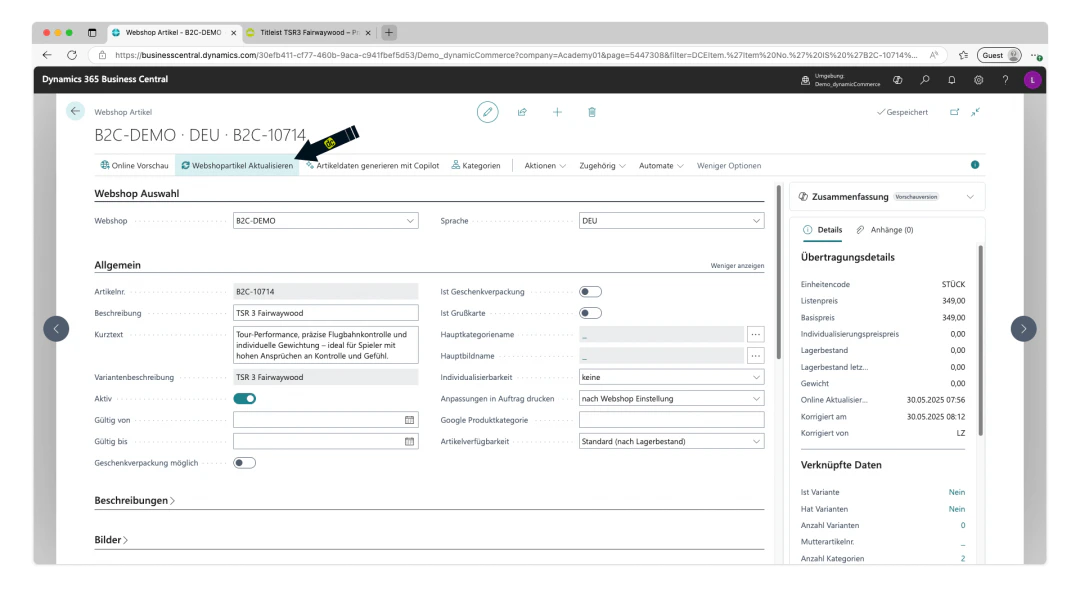
 ## Step 12: Update the Webshop Item
Finally, the webshop item must be updated so that the changes and the newly maintained data are also visible in the webshop.
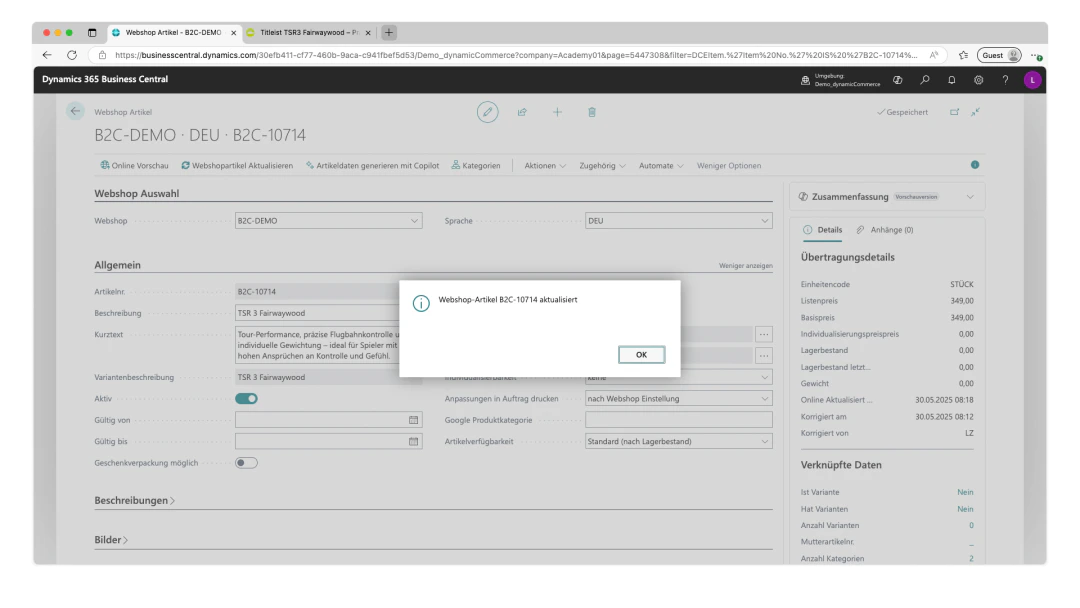
To do this, simply click the "Update Webshop Item" button in the upper ribbon of the webshop item card. After a short wait, the update is confirmed with a message, which can be closed by clicking "OK".
With that, we have already created a beautiful webshop item.
## Step 12: Update the Webshop Item
Finally, the webshop item must be updated so that the changes and the newly maintained data are also visible in the webshop.
To do this, simply click the "Update Webshop Item" button in the upper ribbon of the webshop item card. After a short wait, the update is confirmed with a message, which can be closed by clicking "OK".
With that, we have already created a beautiful webshop item.
 ## Related Topics
Build the category tree for the webshop.
Structure item categories and attributes.
Control item visibility per customer.
## Related Topics
Build the category tree for the webshop.
Structure item categories and attributes.
Control item visibility per customer.